
Most Ergonomic Desk Setup: Build a Workspace That Supports Your Body
The most ergonomic desk setup isn't about buying the fanciest equipment. It's about positioning your body so you can work 8+ hours without pain creeping into your wrists, shoulders, or neck.
Here's the uncomfortable truth: 1 in 3 computer workers will experience repetitive strain injury at some point in their careers. Many of those injuries start with small aches that seem easy to ignore. A stiff neck after lunch. Tingling fingers at 4 PM. Shoulder tension that’s still there on Sunday evening.
If you're reading this, you probably already know something isn't right with your current setup. Maybe you've tried a wrist rest or swapped to a vertical mouse. Maybe the relief was temporary, or it never came at all.
This guide walks you through every component of a truly ergonomic workspace. Not generic advice, but specific measurements, positioning tips, and equipment recommendations based on how the human body actually works at a desk. By the end, you'll know exactly what to adjust, what to add, and what to stop doing.
Key Takeaways
- The most ergonomic desk setup prioritizes neutral body positioning—joints at natural angles, relaxed muscles, and evenly distributed weight—to prevent repetitive strain injuries.
- Set your chair so your feet rest flat on the floor, thighs are parallel to the ground, and the backrest reclines at 100-110 degrees to reduce spinal disc pressure by up to 50%.
- Position your monitor at arm's length (20-26 inches) with the top of the screen at or slightly below eye level to avoid neck strain and forward head posture.
- Replace traditional mice with ergonomic alternatives like vertical mice or centered devices (such as RollerMouse) to reduce wrist pronation and shoulder tension from reaching.
- Take movement breaks every hour—standing, stretching, or walking for 2-3 minutes prevents more injuries than any single equipment purchase.
- Build your ergonomic desk setup incrementally: address your biggest discomfort first, then refine each contact point between your body and workspace over time.
Why Your Desk Setup Matters More Than You Think

Your desk setup directly affects your musculoskeletal health, cognitive performance, and long-term career sustainability. That's not an exaggeration.
According to the Cleveland Clinic, spending several hours daily at a poorly configured desk leads to predictable patterns of ache and pain. The damage compounds over months and years. What starts as occasional discomfort becomes chronic inflammation, nerve compression, or tendinitis.
The financial cost is real too. Workers with RSI-related conditions miss an average of 23 days per year. Some lose the ability to type or use a mouse entirely, forcing career changes.
But here's what most people miss: ergonomics isn't just about preventing injury. A properly configured workspace also improves focus and output. When your body isn't fighting against awkward angles and sustained tension, your brain has more energy for actual work.
The goal isn't perfection. It's creating a setup where your body can maintain neutral, relaxed positions throughout the day. Neutral means:
- Joints at natural angles (no extreme bending or rotation)
- Muscles in relaxed states (not constantly contracted to hold position)
- Weight distributed evenly (no pressure points)
Every section below addresses one piece of this puzzle. Start with whatever causes you the most discomfort, but eventually work through all of them. A proper ergonomic desk setup requires attention to every contact point between your body and your workspace.
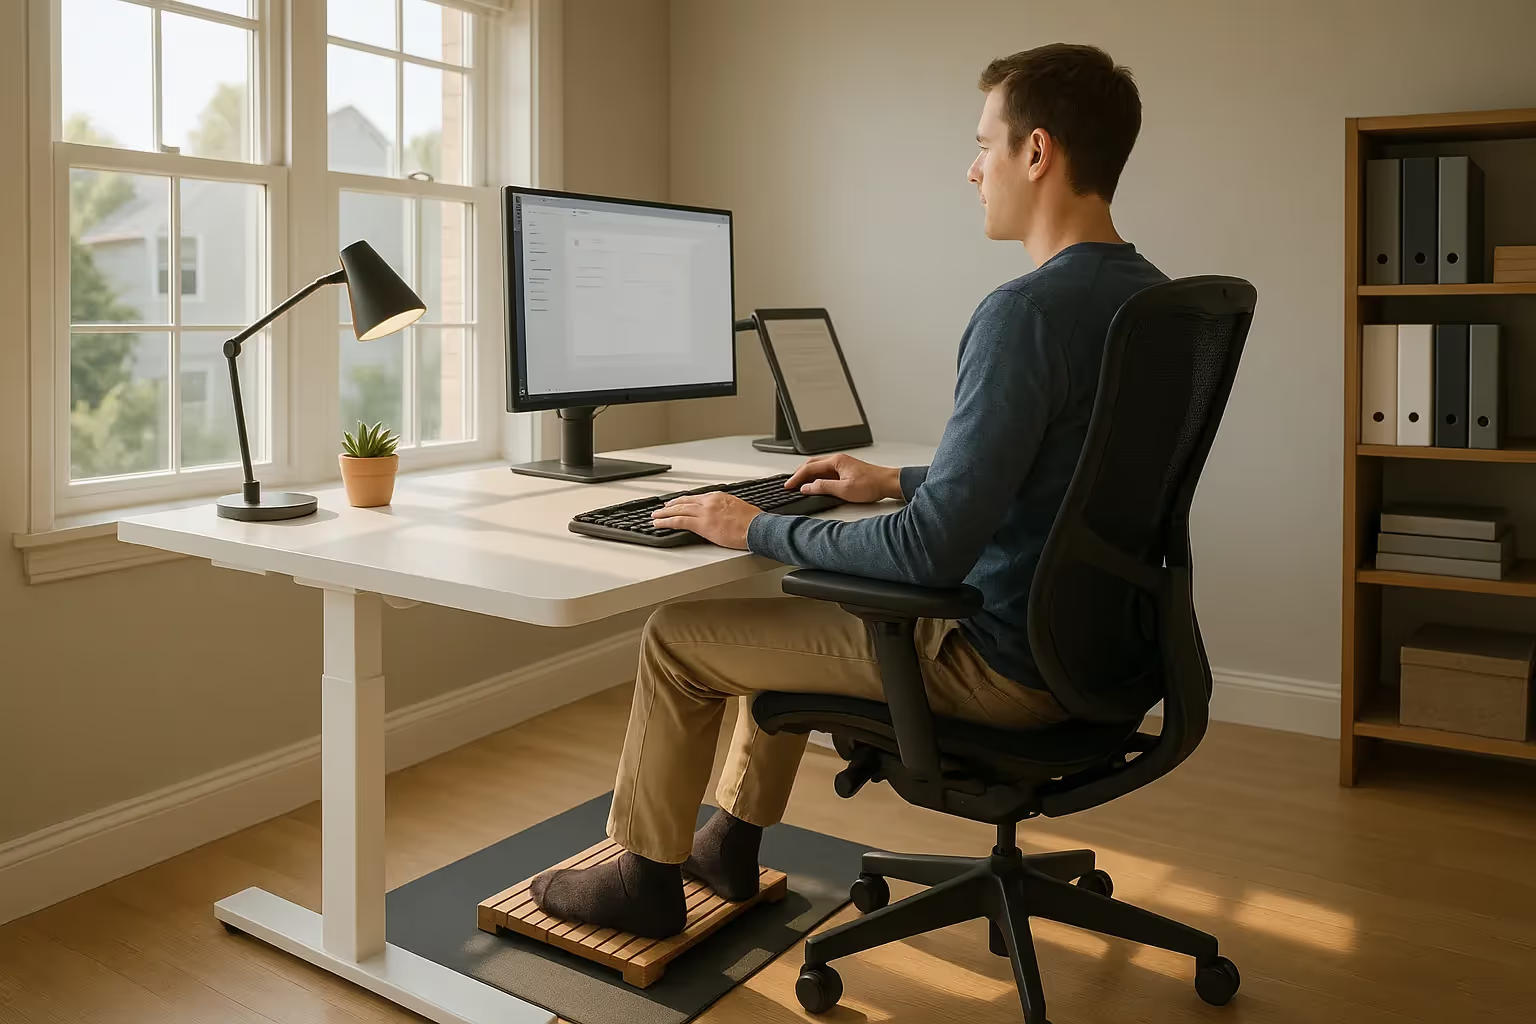
Start With Your Chair and Seated Posture
Your chair determines your foundation. Get this wrong, and everything else becomes a compensation for an incorrect seating setup.
Set your seat height first. Your feet should rest flat on the floor with thighs parallel to the ground. For most people, this means the seat pan sits 16-21 inches off the floor. If your desk is too high for this position, use a footrest rather than raising your chair and letting your feet dangle.
Adjust the backrest angle to 100-110 degrees. This slight recline reduces spinal disc pressure by up to 50% compared to sitting bolt upright at 90 degrees. Make sure lumbar support hits the natural curve in your lower back, typically 6-10 inches above the seat.
Check your armrest height. When typing, your elbows should bend at roughly 90 degrees with forearms parallel to the floor. Armrests that are too high force your shoulders into a shrugged position. Too low, and your arms hang unsupported.
Common mistakes to avoid:
- Perching on the edge (no back support, muscles work constantly)
- Crossing legs (creates hip imbalance and restricts circulation)
- Seat pan too deep (cuts into the back of your knees)
One honest admission: even the best chair won't save you if you sit in it for 10 hours straight. Your body needs movement. Set a timer to stand, stretch, or walk for 2-3 minutes every hour. This single habit prevents more injuries than any equipment purchase.
Action step: Spend 5 minutes today adjusting your chair to these specifications. Most people have never touched the adjustment levers after initial setup.
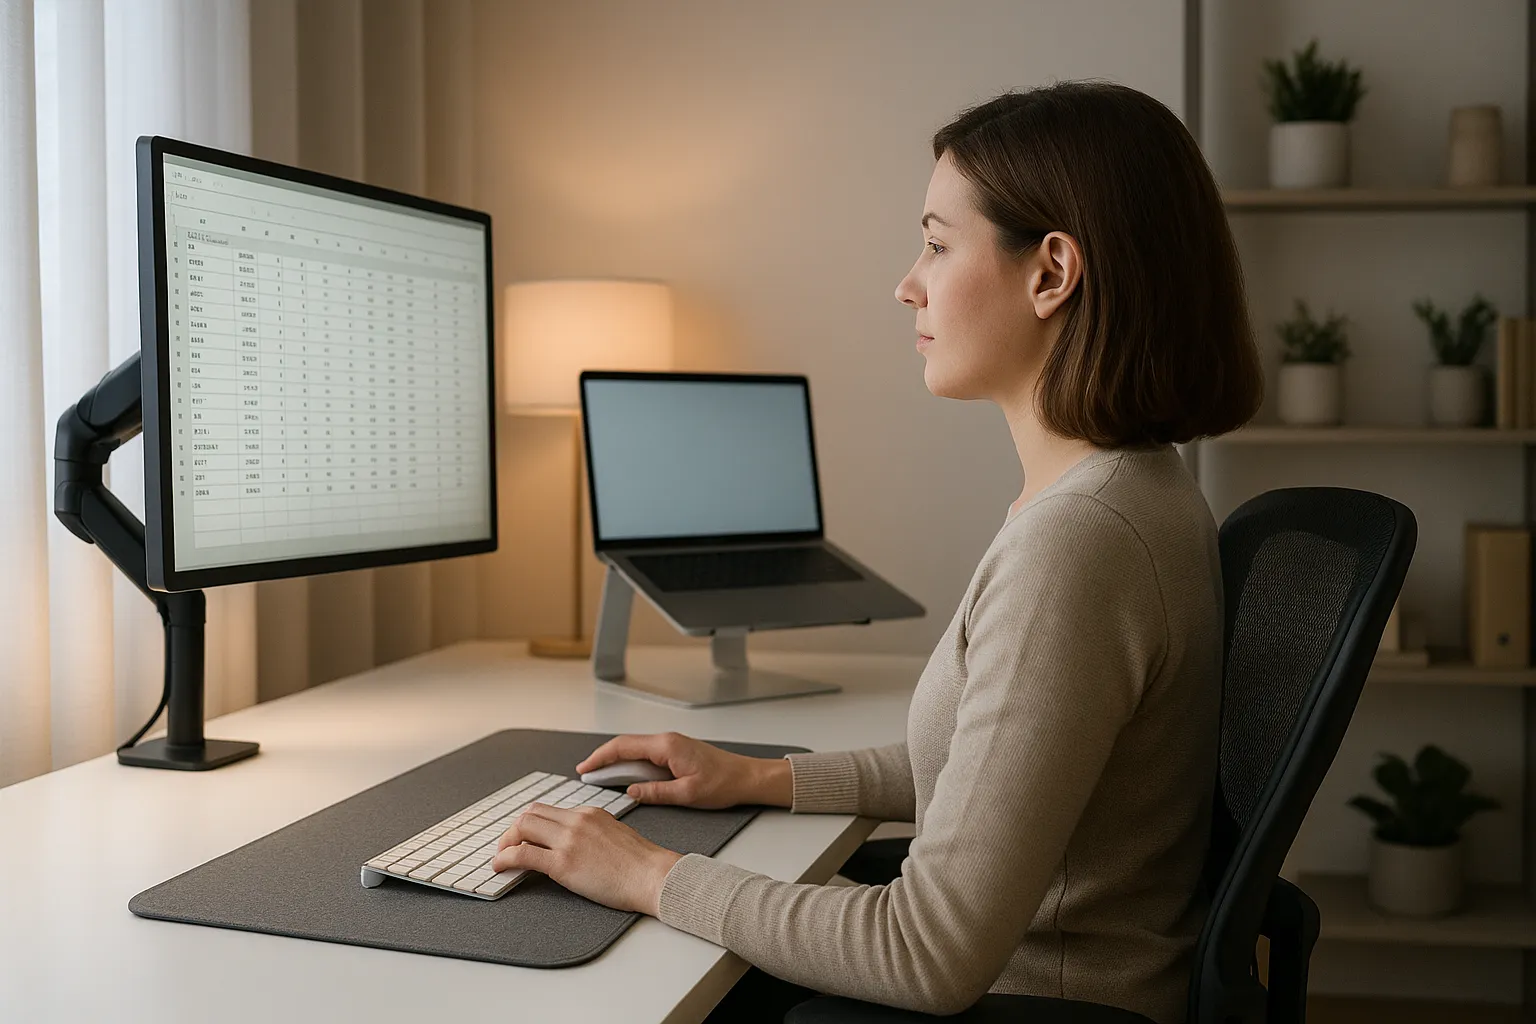
Position Your Monitor at the Right Height and Distance
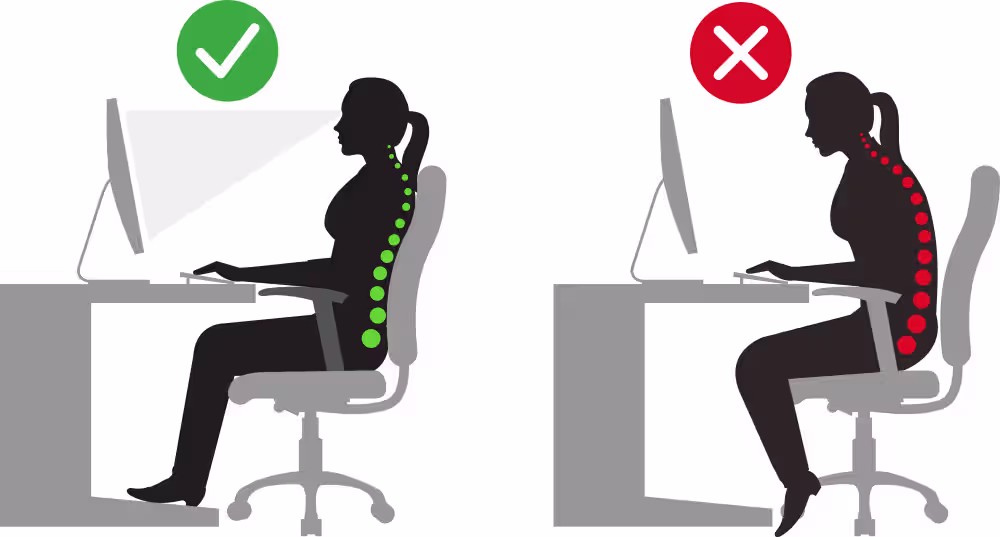
Monitor positioning affects your neck, upper back, and eyes. The wrong height creates forward head posture, adding 10 pounds of effective weight to your neck for every inch your head moves forward.
The top of your screen should sit at or slightly below eye level. This keeps your neck in neutral alignment while viewing the center of the screen, where you spend most of your time. If you wear bifocals or progressive lenses, position the monitor 1-2 inches lower to avoid tilting your head back.
Distance matters as much as height. The Mayo Clinic recommends positioning your monitor at arm's length, roughly 20-26 inches from your eyes. Too close causes eye strain and forces you to focus muscles harder. Too far makes you lean forward to read.
For dual monitors, your setup depends on usage patterns:
- Equal use: Center the seam between monitors directly in front of you
- Primary/secondary: Center the main monitor, angle the secondary 30 degrees to the side
Laptop users face a trade-off. The screen height that's good for your neck puts the keyboard too high for your wrists. The solution is an external keyboard and mouse with the laptop raised on a stand. This one change eliminates the most common source of laptop-related neck pain.
Brightness should match your environment. A screen that's much brighter than your surroundings causes eye fatigue within hours. If you can see your reflection clearly, the screen is too dim. If it feels like staring into a light, it's too bright.
Action step: Take 2 minutes to check your current monitor distance by reaching forward to touch it. If placed correctly, your fingertips will just graze the screen. If it's outside 20-26 inches, adjust today. For a complete visual guide to positioning, reference diagrams that show ideal angles for your specific setup.
Choose a Keyboard That Keeps Your Wrists Neutral
Standard keyboards force your wrists into two problematic positions: ulnar deviation (angling outward toward your pinkies) and pronation (palms facing down). Both stress the tendons running through your carpal tunnel and raise your risk of carpal tunnel syndrome over time
A neutral wrist position means:
- Wrists straight, not angled left or right
- Wrists flat or slightly elevated, not bent up or down
- Forearms supported, not hovering
Split keyboards address ulnar deviation by separating the key halves at shoulder width. Your arms stay parallel rather than angling inward. Some users find relief immediately. Others need 1-2 weeks to adapt their typing.
Keyboard tilt matters more than most people realize. Those flip-out feet on the back? They often make things worse. Raising the back of the keyboard forces your wrists to extend upward. A flat or negative tilt (front edge higher than back) keeps wrists neutral.
Keyboard trays can help if your desk height isn't adjustable. A good tray positions the keyboard 1-2 inches below desk height, allowing a slight downward slope toward your lap.
One thing that doesn't help much: wrist rests during active typing. They're designed for resting between typing bursts, not for parking your wrists while you type. Pressing your carpal tunnel against a padded surface while moving your fingers increases compression, not relief.
Action step: Look at your wrists right now as you type. Are they angled outward? Bent upward? If yes, consider a split keyboard or keyboard tray. For a detailed walkthrough on keyboard and desk positioning, see this guide on setting up your desk ergonomically correct.
Upgrade to an Ergonomic Mouse or Pointing Device
The traditional computer mouse is an ergonomic compromise. Your hand pronates fully (palm down), your wrist anchors while your fingers reach, and repetitive clicking concentrates force on a few small tendons.
Mouse use is the leading driver of upper-limb RSI in office workers, which is why the pointing device is often the highest-impact upgrade you can make. 9 out of 10 RSI cases involving the upper limb relate to mouse use. That's not because keyboards are safe. It's because the mouse requires sustained grip, precise movements, and constant repositioning across the desk surface.
Ergonomic alternatives address these issues differently:
- Vertical mice rotate your hand into a handshake position, reducing pronation
- Trackballs eliminate the reaching and repositioning that strains shoulders
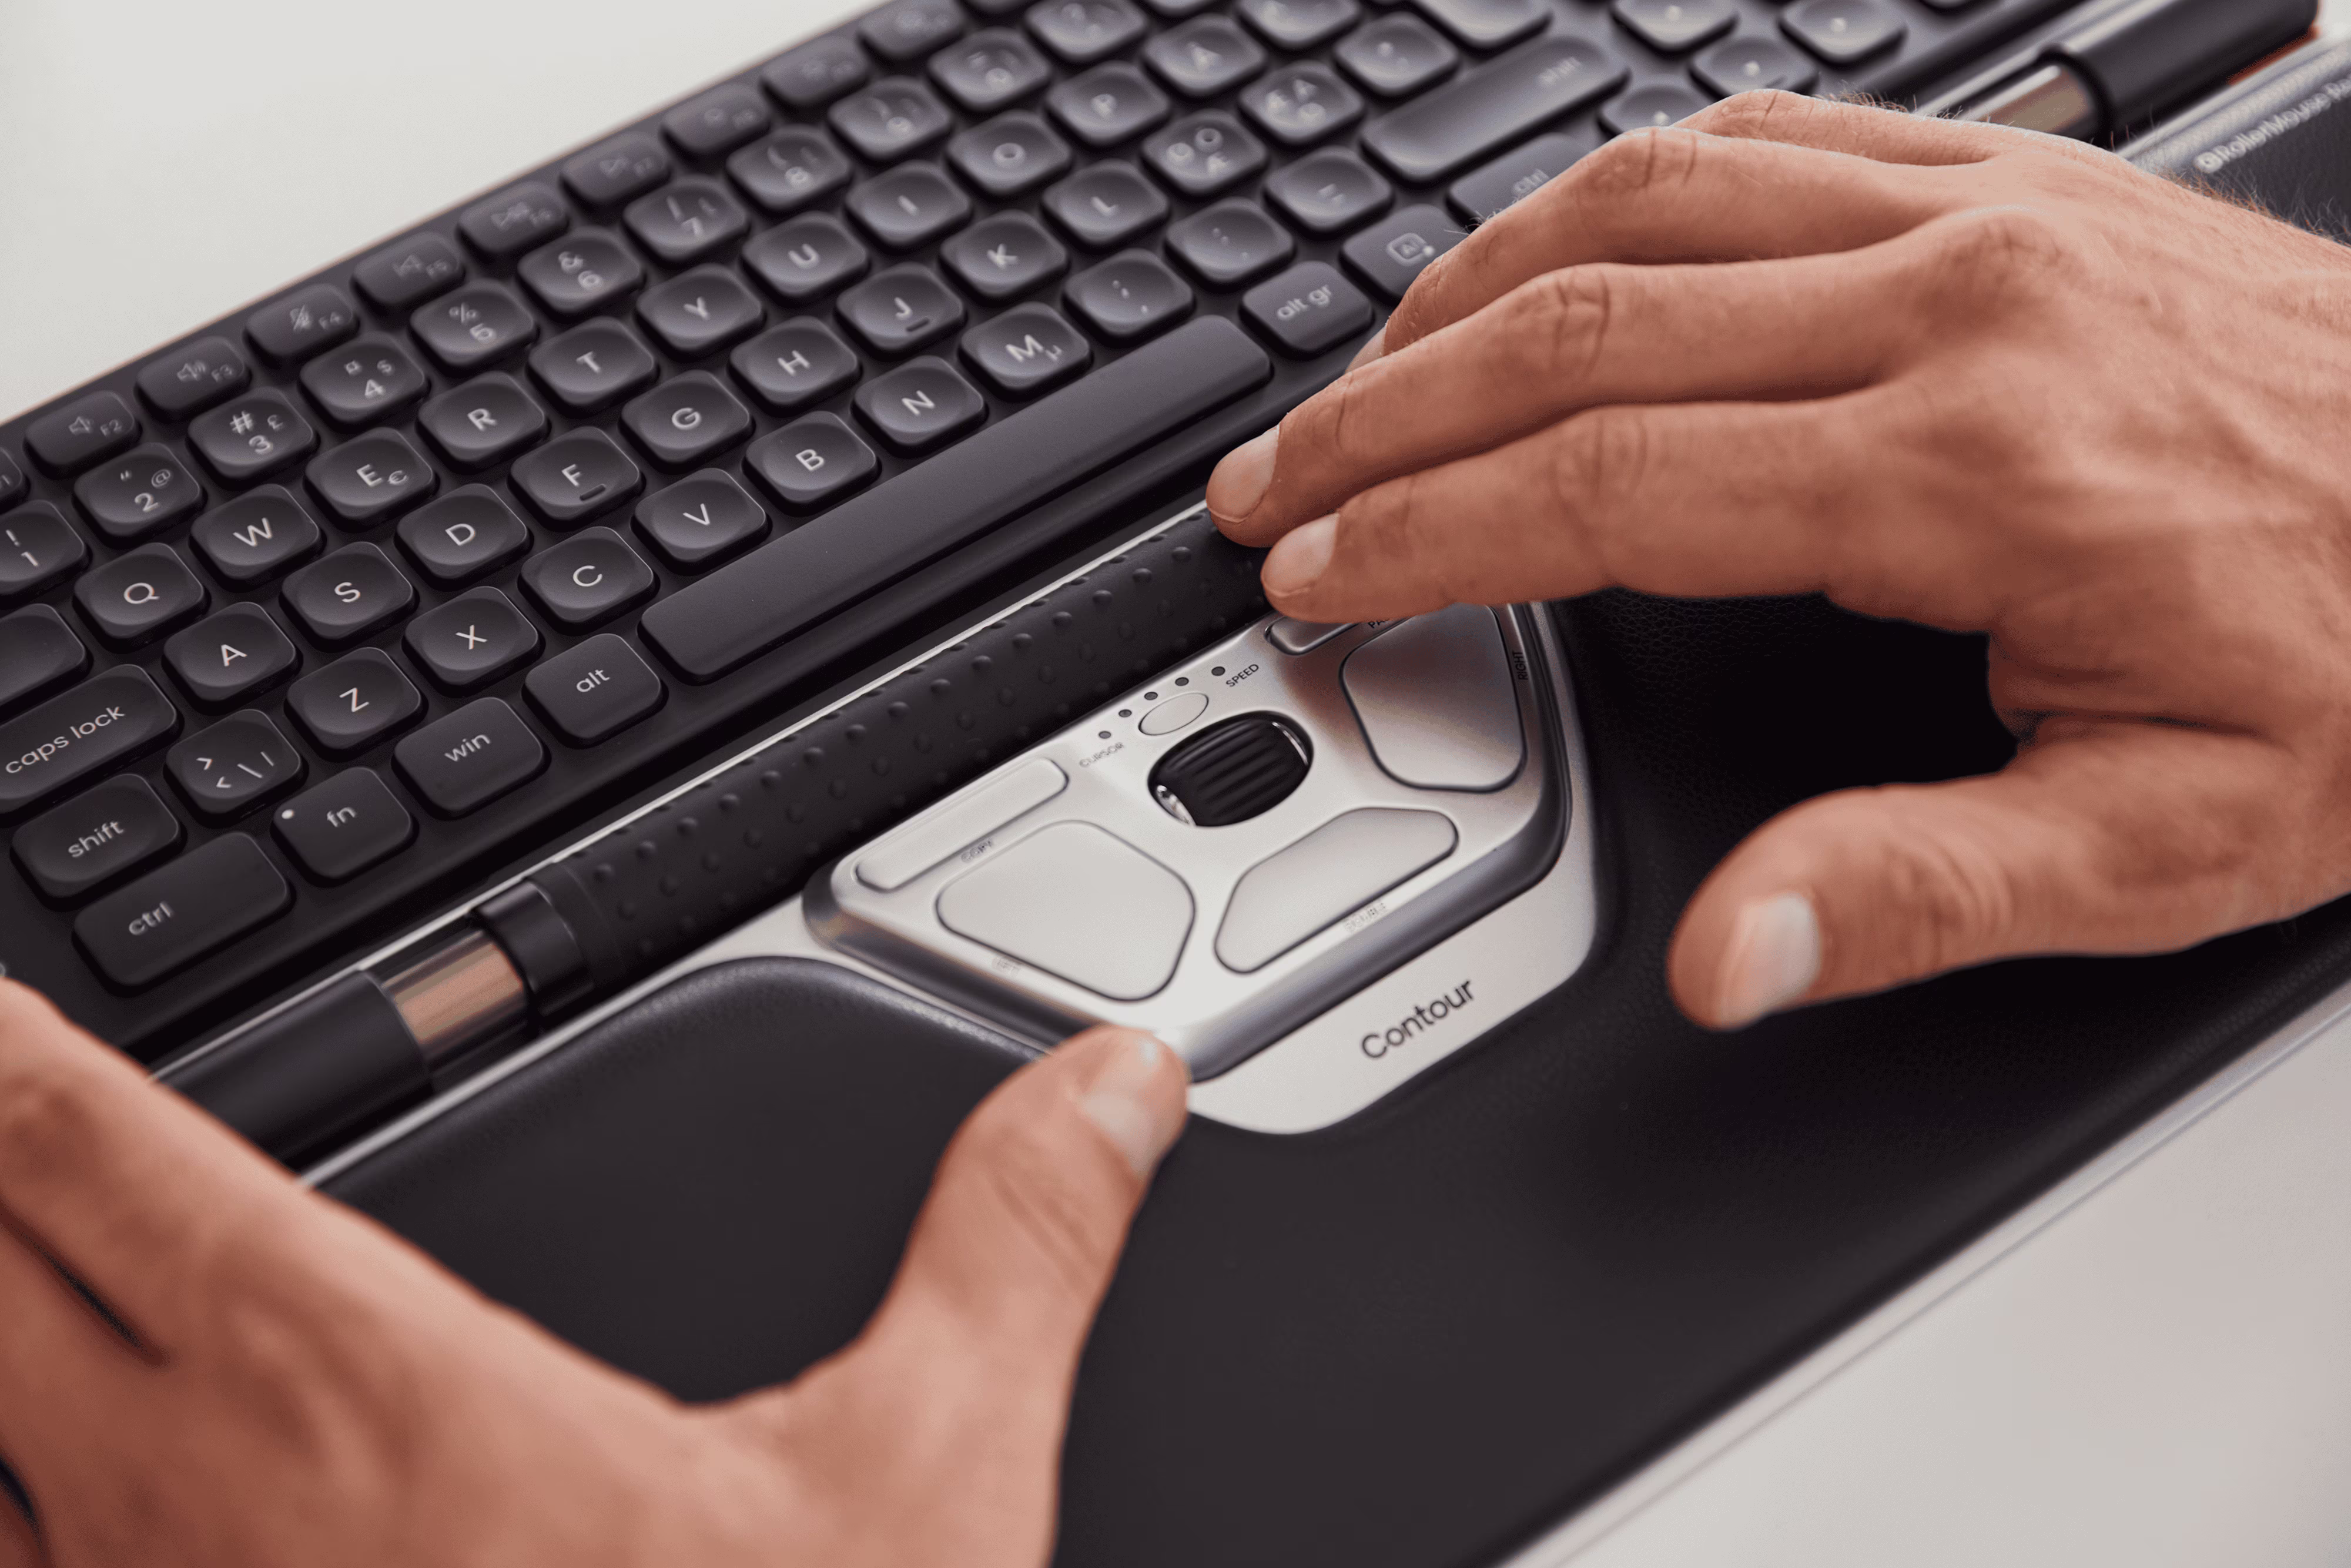
- RollerMouse keep your hands centered and eliminate grip entirely
- Adjustable mice (like the Unimouse) let you find the exact angle that works for your anatomy
What works best depends on your specific symptoms. Wrist pain often responds to vertical designs. Shoulder and neck tension often responds to centered devices that eliminate reaching.
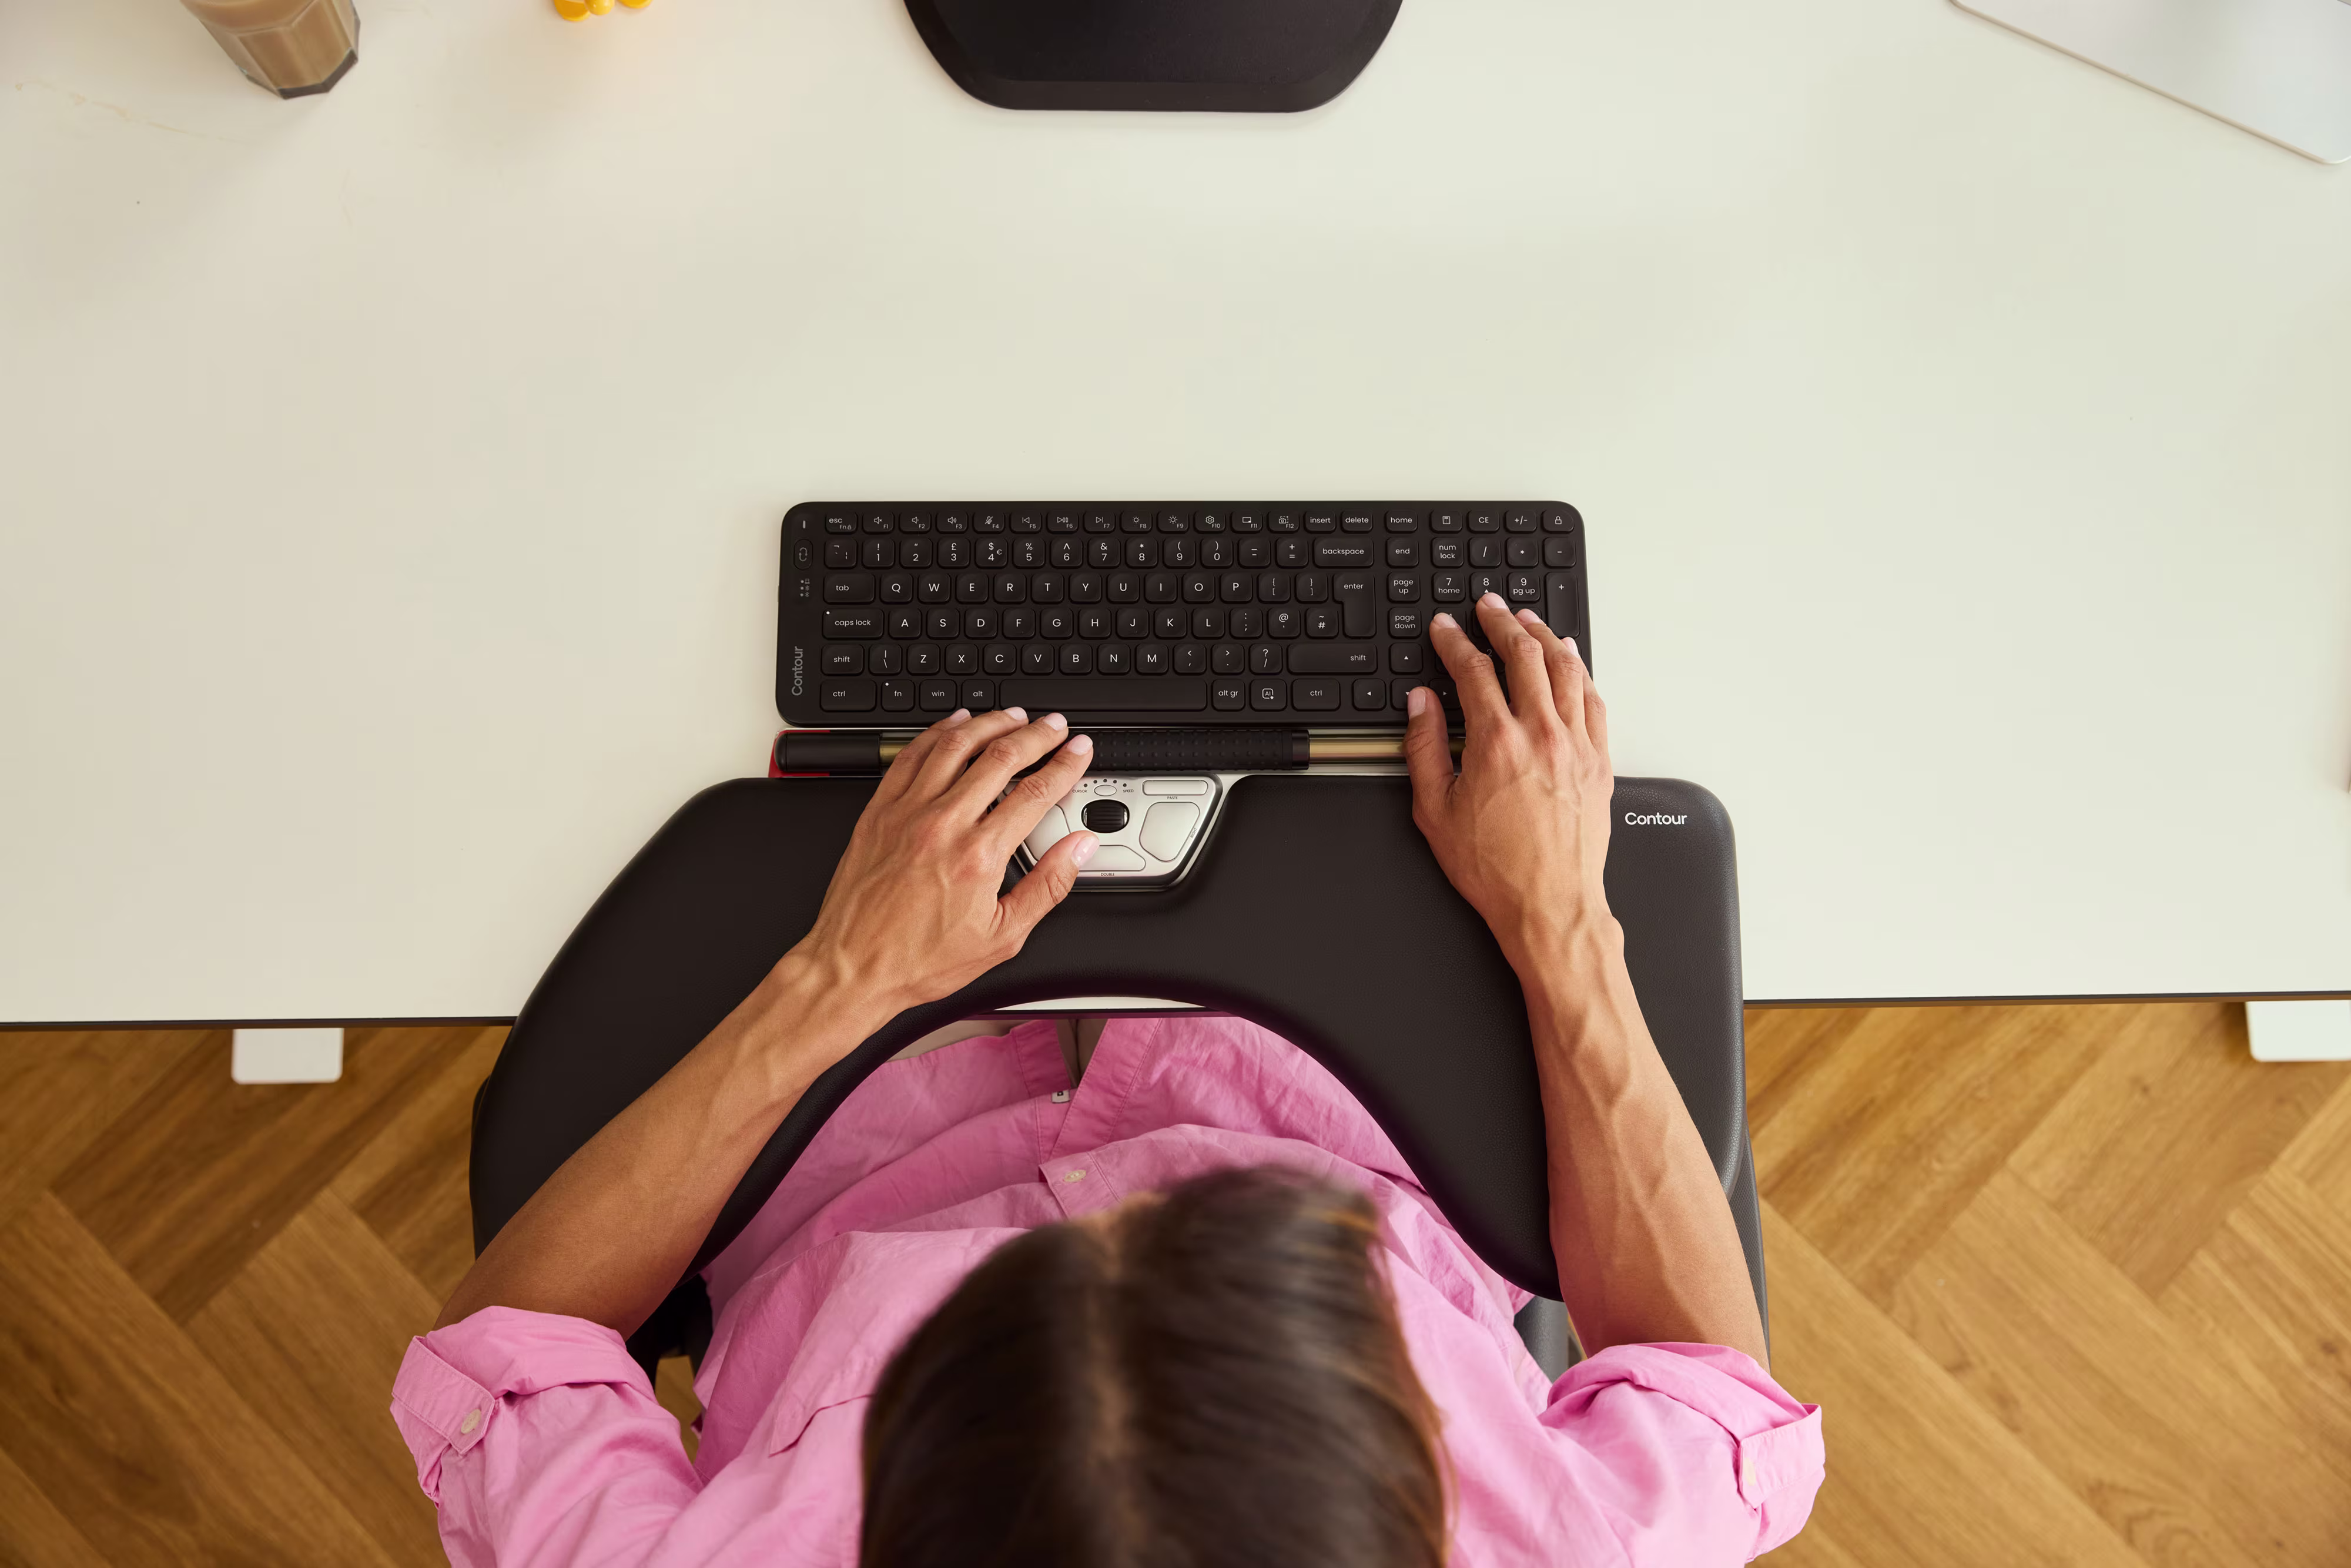
Centered vs. Traditional Mouse Placement
Traditional mouse placement puts the device to the right of your keyboard (or left for lefties). This forces your arm into abduction, holding it away from your body for hours. The sustained muscle tension in your shoulder accumulates into that familiar end-of-day ache. This pattern of sustained arm abduction is one of the most common causes of mouse shoulder - a form of RSI that builds slowly and can take months to recover from.
Centered pointing devices sit directly in front of you, between your keyboard and body. Your arms stay at your sides, shoulders relaxed. The difference is dramatic for people with shoulder or upper back issues.
Contour Design's RollerMouse exemplifies this approach. Instead of gripping and dragging, you roll a bar with your fingertips. Users report significant relief from wrist and forearm tension because the movement pattern distributes effort across different muscle groups.
The transition takes about a week for most users. Expect slight productivity loss during the first few days as your muscle memory adapts.
Action step: If you experience any clicking-related finger pain or shoulder tension from reaching, try a centered device for two weeks. Many manufacturers, including Contour Design, offer trial periods so you can test before committing.
Optimize Desk Height and Surface Organization
Your desk height determines whether all your other ergonomic adjustments actually work together.
Standard desks sit at 29-30 inches. This works for people around 5'10" tall. If you're shorter or taller, a fixed-height desk forces compensations elsewhere, like raising your chair and using a footrest, or hunching to reach a keyboard that's too low.
Sit-stand desks offer flexibility, but only if you actually use them. Wirecutter's ergonomics experts note that the ideal setup supports your body whether you're sitting or standing. When standing, your elbows should still bend at 90 degrees with wrists neutral.
Surface organization affects reach patterns. Items you use constantly, like your mouse and keyboard, belong in the primary zone directly in front of you. Items used occasionally, like a notepad or phone, go in the secondary zone within arm's reach. Everything else stays out of the way.
Clutter creates micro-reaches. When you constantly move things aside to access your mouse or keyboard, you're adding dozens of unnecessary arm movements per hour. A clean desk surface isn't just aesthetically pleasing. It's functionally ergonomic.
Document placement matters too. If you reference papers while typing, a document holder positioned next to your monitor prevents the neck rotation that comes from looking down at your desk repeatedly.
Action step: Measure your desk height and compare it to the recommended height for your body (use an online calculator based on your sitting elbow height). If there's a mismatch greater than 2 inches, consider a desk riser, keyboard tray, or adjustable desk.
Add Supportive Accessories for All-Day Comfort
Core equipment handles most ergonomic needs. Accessories fill specific gaps based on your body, work style, and remaining pain points.
Footrests benefit anyone whose feet aren’t resting flat when their chair is at the correct height. Look for adjustable angle and height. A simple angled platform works for most, while rocking footrests add movement for people who fidget.
Monitor arms provide adjustability that built-in stands can't match. They free up desk space and let you dial in the exact height, distance, and angle. For dual monitors, a single arm with two mounts keeps things organized.
Task lighting reduces eye strain when ambient lighting creates shadows or glare. Position a desk lamp to illuminate documents without reflecting off your screen. LED options with adjustable color temperature let you match your lighting to time of day.
Anti-fatigue mats make standing tolerable for longer periods. Without one, most people last 20-30 minutes before discomfort drives them back to sitting. A good mat extends comfortable standing time to 60+ minutes.
What you probably don't need:
- Wrist rests for active typing (compression during movement)
- Monitor filters (modern screens have adequate anti-glare)
- Posture corrector bands (treat symptoms, not causes)
Research from Cornell University's ergonomics program provides a comprehensive checklist for evaluating computer workstations. Use it to audit your setup systematically.
For a complete breakdown of equipment choices and positioning, review this guide on creating an ergonomic office desk setup that addresses RSI prevention specifically.
Action step: Identify your single biggest remaining discomfort. Research accessories that specifically address that issue rather than buying a bundle of items you may not need.
Conclusion
Building the most ergonomic desk setup is a process, not a single purchase. Start with the basics: chair height, monitor position, keyboard angle. Address obvious problems first, then refine.
The goal isn't a perfect Instagram-worthy workstation. It's a workspace where you can do your best work without your body paying the price. Some adjustments cost nothing. Others require investment. All of them pay dividends in comfort, focus, and career longevity.
If you're dealing with existing pain, make changes gradually and pay attention to what helps. Not every ergonomic product works for every body. Trial periods exist for a reason.
Your workspace should support you, not fight you. Make one adjustment today, then build from there.
Frequently Asked Questions
What is the most ergonomic desk setup for preventing pain?
The most ergonomic desk setup positions your body in neutral alignment throughout the day. This means your chair supports a 100-110 degree backrest angle, your monitor sits at eye level and arm's length away, and your keyboard keeps wrists straight—not bent upward or angled outward.
How high should my monitor be for an ergonomic desk setup?
Position your monitor so the top of the screen sits at or slightly below eye level. This prevents forward head posture, which adds roughly 10 pounds of strain to your neck for every inch your head moves forward. Most people need their monitor 20-26 inches from their eyes.
Why does my neck hurt after working at my desk all day?
Neck pain typically results from poor monitor height or forward head posture. When your screen is too low, you tilt your head down constantly. When it's too far away, you lean forward to read. Both positions strain neck muscles and compress spinal discs over time.
What is the best ergonomic mouse position to reduce shoulder tension?
Centered pointing devices, placed between your keyboard and body, eliminate the reaching motion that causes shoulder strain. Traditional mouse placement forces your arm away from your body for hours, creating sustained muscle tension. Devices like rollerbars distribute effort across different muscle groups.
How often should I take breaks from my ergonomic desk setup?
Stand, stretch, or walk for 2-3 minutes every hour. Even the best ergonomic setup won't prevent injury if you remain static for extended periods. Regular movement breaks prevent more repetitive strain injuries than any single equipment purchase.
Can a standing desk improve my ergonomic setup?
Sit-stand desks offer flexibility, but only if you actually alternate positions throughout the day. When standing, maintain the same ergonomic principles: elbows bent at 90 degrees, wrists neutral, and monitor at eye level. Use an anti-fatigue mat to extend comfortable standing time beyond 30 minutes.

Which Device Is Right for You?
Take a quick quiz and get a personalized recommendation based on how you work.
