
Ergonomic Desk Setup Diagram: Your Visual Guide to a Pain-Free Workspace

An ergonomic desk setup diagram can transform your workspace from a source of daily discomfort into a place where you actually feel good. If you've spent years hunched over a laptop or reaching for a poorly placed mouse, you already know the toll it takes: stiff shoulders, aching wrists, that persistent neck tension that follows you home.
Here's the thing most people miss: small adjustments create massive relief. The difference between a monitor positioned at eye level versus two inches too high? That's the difference between ending your workday energized or reaching for the ibuprofen.
This guide breaks down every element of a proper ergonomic setup with clear visuals you can reference as you adjust your own space. Whether you're recovering from repetitive strain injury or trying to prevent one, you'll find practical steps you can carry out today.
Key Takeaways
- An ergonomic desk setup diagram helps you visualize the ideal positioning of your monitor, keyboard, chair, and feet to prevent pain and boost productivity.
- Position your monitor 20–26 inches from your eyes with the top at or below eye level to reduce neck strain and eye fatigue.
- Keep your elbows at 90 degrees with wrists straight and neutral while typing to avoid repetitive strain injuries.
- Your chair should support your lumbar curve with feet flat on the floor and thighs parallel to the ground for proper spinal alignment.
- Small adjustments—like clearing under-desk clutter, adding lumbar support, or repositioning your mouse—can deliver noticeable relief within days.
- Set a reminder to stand and stretch every 45–60 minutes, since even a perfect ergonomic desk setup can't replace regular movement.
Why Your Desk Setup Matters More Than You Think

Your desk setup directly affects your body for 6 to 10 hours every single day. That adds up to roughly 2,000 hours per year of either supporting your body or slowly damaging it.
Poor workstation ergonomics contributes to musculoskeletal disorders that affect 1 in 3 office workers according to occupational health research. These aren't minor inconveniences. We're talking about carpal tunnel syndrome, chronic neck pain, lower back problems, and shoulder injuries that can derail careers.
The financial impact hits hard too. Research shows that an ergonomically correct workstation reduces injury-related absences and increases productivity by up to 25%.
Proper ergonomics delivers these benefits:
- Reduced strain on muscles and joints
- Improved circulation during long work sessions
- Better posture that prevents spinal compression
- Decreased eye fatigue and headaches
- Higher focus and output throughout the day
The Mayo Clinic's office ergonomics guide emphasizes that workspace setup directly influences your comfort, productivity, and long-term health outcomes.
I learned this lesson the hard way. After ignoring wrist pain for months, I finally adjusted my keyboard height and mouse position. The relief came within days, not weeks. Don't wait for pain to become your teacher.
Action step: Take a photo of your current desk setup right now. You'll reference it as we go through each element below.
The Ideal Ergonomic Desk Setup: A Complete Diagram Breakdown

Every element connects to the others. Your chair height determines your keyboard position. Your keyboard position affects your shoulder alignment. Your monitor height influences your neck posture. Change one thing, and you may need to adjust everything else.
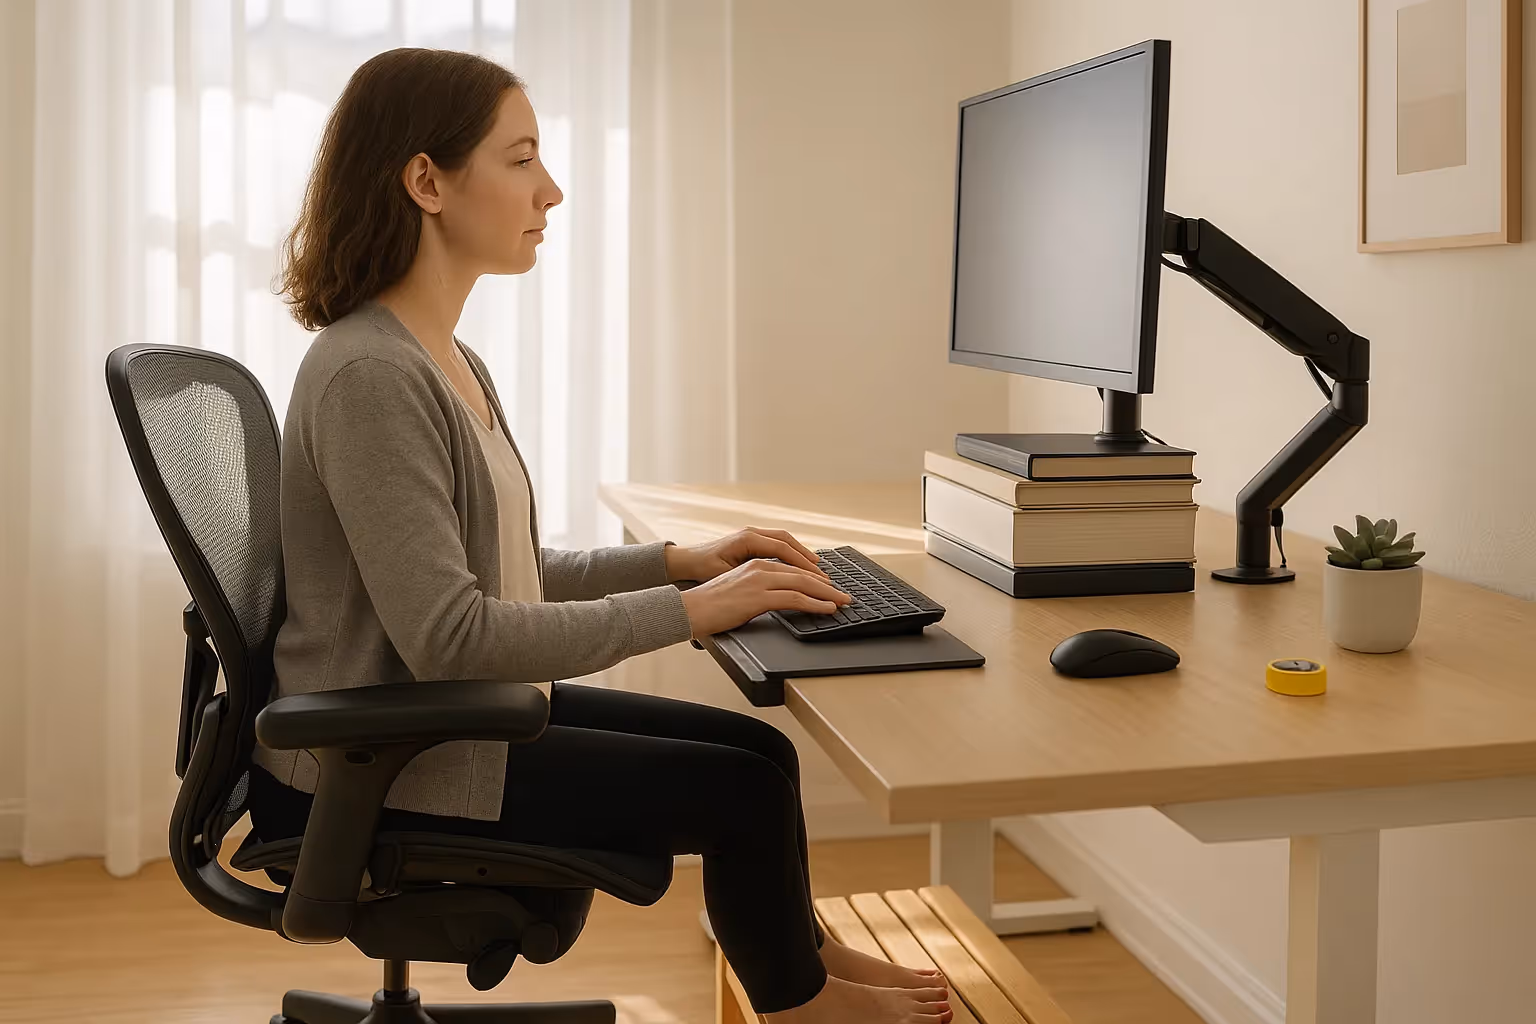
Monitor Height and Distance
The top of your screen should sit at or slightly below eye level. When you look straight ahead with your head in a neutral position, your eyes should naturally fall on the upper third of the screen.
Position your monitor 20 to 26 inches (50 to 70 centimetres) from your eyes. Here's an easy test: extend your arm straight out. Your fingertips should just touch the screen.
Tilt the monitor upward between 10 and 20 degrees. This reduces glare and allows you to see the entire screen without tilting your head.
Special considerations:
- Bifocal wearers: Lower the monitor 1 to 2 inches below standard height
- Dual monitors: Angle them inward at 15 degrees each, with your primary monitor directly ahead
- Laptop users: Use a laptop stand plus external keyboard, or you'll constantly look down
The CCOHS monitor positioning guidelines note that improper screen placement causes 70% of computer-related vision problems.
Action step: Grab a ruler and measure from your eyes to your screen. Adjust today if it falls outside the 20 to 26 inch range.
Chair Position and Posture Support
Your chair does the heavy lifting for spinal health. Literally.
Feet should rest flat on the floor with your thighs parallel to the ground. If your feet dangle even slightly, blood flow to your legs decreases and lower back strain increases.
Set your knees at a 90-degree angle or slightly more open. Your hips should sit slightly higher than your knees, which encourages a natural lumbar curve rather than a slouch.
Lumbar support matters enormously. The backrest should fit the natural S-curve of your spine, supporting the inward curve of your lower back. Without this support, your back muscles work constantly to hold you upright.
Armrest positioning:
- Height should allow shoulders to relax completely
- Elbows rest at roughly 90 degrees
- Armrests shouldn't push shoulders up or let arms hang
Many people set armrests too high, which causes shoulder tension that radiates into the neck. If you can't adjust your armrests properly, consider removing them entirely.
Action step: Sit in your chair and check if your feet fully contact the floor. If not, add a footrest or lower your chair height.
Keyboard and Mouse Placement

This is where repetitive strain injuries begin. Poor keyboard and mouse placement forces your wrists, forearms, and shoulders into unnatural positions thousands of times daily.
Your elbows should bend at 90 degrees with forearms parallel to the floor. Keep elbows close to your body rather than flared out.
Wrists must stay straight and neutral, not bent upward, downward, or to either side. If you see a crease at your wrist while typing, something's wrong.
Place your mouse at the exact same height as your keyboard. Reaching up or down for the mouse creates shoulder strain that compounds over time. Centered pointing devices like the RollerMouse position your hands directly in front of your body, which eliminates the reaching motion that aggravates shoulder and neck tension.
Keyboard placement matters too. Center it with your body's midline, not shifted left to accommodate a number pad you rarely use.
Action step: Type a few sentences and watch your wrists. If they bend in any direction, adjust your keyboard height or angle.
Desk Height and Leg Clearance
Standard desk height is 29 to 30 inches, but that only works for people around 5'10" tall. Everyone else needs adjustments.
Your desk surface should allow your forearms to rest parallel to the floor when your elbows bend at 90 degrees. If you can't achieve this with chair adjustments alone, consider a keyboard tray or height-adjustable desk.
Leg clearance is non-negotiable. You need at least:
- 24 inches of width for your knees
- 20 inches of depth for your legs
- Enough height to cross your legs occasionally
Clutter under your desk restricts movement and forces awkward leg positions. Remove storage bins, CPU towers, and that exercise bike you're definitely not using.
The Cleveland Clinic recommends clearing the space beneath your work surface to allow natural shifting throughout the day.
Action step: Clear everything from under your desk today. See how it changes your sitting posture.
Common Desk Setup Mistakes That Lead to Pain

After reviewing hundreds of workstation setups, certain mistakes appear constantly. Recognising these patterns helps you spot problems in your own space.
Monitor too high or too low: This forces your neck into chronic flexion or extension. Just 15 degrees of forward head tilt increases the effective weight on your neck from 12 pounds to 27 pounds.
Chair too high with dangling feet: When feet don't touch the floor, pressure concentrates under your thighs. This restricts blood flow and forces your pelvis to tilt backward, flattening your lumbar curve.
Mouse positioned too far away: Reaching for your mouse all day strains the shoulder, rotator cuff, and trapezius muscles. This is the primary cause of mousing-related pain.
Keyboard tilted upward at the back: Those little keyboard feet? They force your wrists into extension. Try a negative tilt instead, where the front edge sits slightly higher than the back.
Working on a laptop without external peripherals: Laptops create an impossible choice: look down at the screen or reach up to the keyboard. Neither option works for extended use.
Ignoring lighting and glare: Bright windows behind or in front of your monitor cause squinting and forward leaning. Position your desk perpendicular to windows when possible.
This guide to your working environment covers additional environmental factors that affect comfort.
Action step: Identify which of these mistakes applies to your current setup. Fix the most obvious one before reading further.
How to Customise Your Setup for Your Body
Generic ergonomic advice assumes an average body. But if you're 5'2" or 6'4", standard recommendations need modification.
For shorter individuals (under 5'5"):
- Use a footrest to support feet when chair is raised
- Consider a keyboard tray to lower typing surface
- Stack books or use a monitor riser to bring screens to eye level
- Look for chairs with shorter seat pans (under 16 inches deep)
For taller individuals (over 6'0"):
- Raise desk height with furniture risers or blocks
- Choose monitors on adjustable arms for additional height range
- Select chairs with longer seat pans and higher backs
- Add a sit-stand desk converter for flexibility
The CCOHS guidelines on sit-stand desks explain how alternating between sitting and standing benefits users of all heights.
Testing your setup:
Once you make adjustments, work at your desk for 30 minutes. Notice where tension builds. Discomfort in the first half hour signals a setup problem, not a fatigue issue.
Ask someone to photograph you from the side while working. Compare your posture against the diagram above. Often we think we're sitting neutrally when we're actually slouched or reaching.
Formal workplace assessments can identify issues you've become blind to through habit.
This advice works best for: Anyone experiencing discomfort who hasn't yet found the right combination of adjustments. It's less useful if you have a diagnosed condition requiring specific medical guidance.
Action step: Measure your seated eye height from the floor. Use this number to set your monitor position precisely.
Quick Ergonomic Adjustments You Can Make Today
You don't need new furniture to improve your setup. These five adjustments take less than 15 minutes combined and cost nothing.
1. Plant your feet flat (2 minutes)
If your feet dangle, stack books or a cardboard box as a temporary footrest. Aim for thighs parallel to the floor.
2. Check your elbow angle (1 minute)
Sit at your desk and let your arms hang naturally. Bend your elbows to 90 degrees. Your hands should hover just above the keyboard. If not, adjust chair height.
3. Align your monitor (5 minutes)
Close your eyes, sit in your working position, then open them. Where do your eyes naturally land? That spot should hit the upper third of your screen. Raise or lower accordingly.
4. Clear your leg space (3 minutes)
Remove everything from under your desk. Every bag, box, and cable mess needs to go somewhere else.
5. Add lumbar support (2 minutes)
No built-in lumbar support? Roll up a towel or small pillow and place it in the curve of your lower back. Test different thicknesses.
Bonus: Set a movement reminder
Even perfect ergonomics can't replace movement. Set a timer to stand and stretch every 45 to 60 minutes. A 2-minute break prevents hours of stiffness.
Action step: Complete all five adjustments right now, before closing this article. Time yourself. Most people finish in under 10 minutes.
An ergonomic desk setup diagram is a powerful starting point, but having a clear, step-by-step process makes implementation far more effective. Follow this guide on how to set up an ergonomic workstation that actually prevents RSI pain to turn the principles in this article into a practical layout tailored to your body and daily tasks.
Conclusion
Your ergonomic desk setup diagram serves as a daily reference point, not a one-time checklist. Bodies change. Work demands shift. The setup that worked last year might need tweaking today.
The fundamentals stay constant: monitor at eye level, elbows at 90 degrees, feet flat, wrists neutral. Everything else adjusts around those anchor points.
Start with whichever adjustment addresses your most persistent pain. For most people, that's either monitor height or mouse placement. One change often cascades into noticing other issues you'd normalised.
You spend too many hours at your desk to feel lousy doing it. Make these adjustments, then make them again in three months when you notice new patterns. Your future self will thank you.
Frequently Asked Questions
What is the correct monitor height for an ergonomic desk setup?
The top of your monitor should sit at or slightly below eye level when you're seated with your head in a neutral position. Position the screen 20 to 26 inches from your eyes and tilt it upward 10 to 20 degrees to reduce glare. Bifocal wearers should lower the monitor 1 to 2 inches below standard height.
How do I know if my desk setup is causing pain?
Common signs include stiff shoulders, aching wrists, neck tension, and lower back discomfort after working. If your feet dangle, your monitor forces you to look up or down, or you reach for your mouse, these setup mistakes create strain. Discomfort within the first 30 minutes of working signals a setup problem, not fatigue.
What is the proper keyboard and mouse placement in an ergonomic desk setup diagram?
Your elbows should bend at 90 degrees with forearms parallel to the floor and close to your body. Keep wrists straight and neutral—never bent. Place your mouse at the exact same height as your keyboard to prevent shoulder strain from reaching up or down throughout the day.
Can I improve my desk ergonomics without buying new furniture?
Yes. Quick adjustments include using stacked books as a footrest, rolling a towel for lumbar support, raising your monitor with books, and clearing clutter from under your desk. These five-minute fixes address the most common ergonomic issues and can provide noticeable relief within days.
Why is lumbar support important for an ergonomic desk setup?
Lumbar support maintains the natural S-curve of your spine, preventing your back muscles from working constantly to hold you upright. Without proper support, your pelvis tilts backward, flattening your lower back and causing chronic pain. A rolled towel or small pillow can serve as temporary lumbar support.
How often should I take breaks from my ergonomic desk setup?
Even with perfect ergonomics, you should stand and stretch every 45 to 60 minutes. A 2-minute movement break prevents hours of stiffness and improves circulation. Alternating between sitting and standing throughout the day provides additional benefits for users of all heights and body types.

Which Device Is Right for You?
Take a quick quiz and get a personalized recommendation based on how you work.
