
How to Set Up a Proper Ergonomic Desk – A Step-by-Step Guide to Pain-Free, Productive Work

A proper ergonomic desk setup can mean the difference between finishing your workday energized or wincing through yet another evening of neck stiffness and wrist aches. If you spend 6–10 hours daily at a computer, your desk arrangement directly shapes your body's health over time.
Here's the good news: small adjustments often yield big relief. According to the Cleveland Clinic, desk workers who dial in their workspace correctly report fewer musculoskeletal complaints and better focus. In this guide, you'll learn exactly how to position your chair, monitor, keyboard, and mouse for neutral posture. You'll also discover the common mistakes that cause pain and the simple fixes that prevent them. Ready to work without physical compromise? Let's get your setup right.
Key Takeaways
- A proper ergonomic desk setup keeps your joints in a neutral position, reducing the risk of chronic issues like carpal tunnel syndrome and lower back pain.
- Set your chair height so your feet rest flat on the floor with knees at 90 degrees, and use lumbar support to maintain your spine's natural curve.
- Position your monitor at arm's length (20–40 inches) with the top of the screen at or slightly below eye level to prevent neck strain.
- Keep your keyboard flat and centered, with elbows at 90 degrees and wrists in a neutral position to avoid repetitive strain injuries.
- Place your mouse immediately beside your keyboard at the same height to minimize shoulder strain from reaching.
- Avoid static posture by organizing your desk to encourage movement and taking regular breaks throughout the workday.
Why Your Desk Setup Matters More Than You Think

Most professionals don't realize how much their workspace configuration affects long-term health. A poorly arranged desk forces your body into unnatural positions for hours. Over months and years, these small misalignments compound into chronic issues like carpal tunnel syndrome, cervical strain, and lower back pain.
The numbers are striking. The U.S. Bureau of Labor Statistics reports that musculoskeletal disorders account for nearly 30% of all worker injury cases requiring time away from work. Many of these injuries trace back to repetitive strain and poor posture at a desk.
Neutral posture is the goal. This means your joints stay relaxed, your muscles work minimally, and your spine maintains its natural curves. When you achieve this, blood flows freely, fatigue decreases, and you can sustain focus without physical distraction.
If you've tried quick fixes like a gel wrist rest or an occasional standing break, you've taken steps in the right direction. But partial solutions leave gaps. A complete guide to ergonomics explains how each element of your workstation connects. Your chair affects your keyboard height. Your monitor position affects your neck. Everything links together.
Action step: Before adjusting anything, spend one workday noticing where tension builds. Note it. That awareness guides your setup changes.
Step 1: Position Your Chair for Neutral Posture
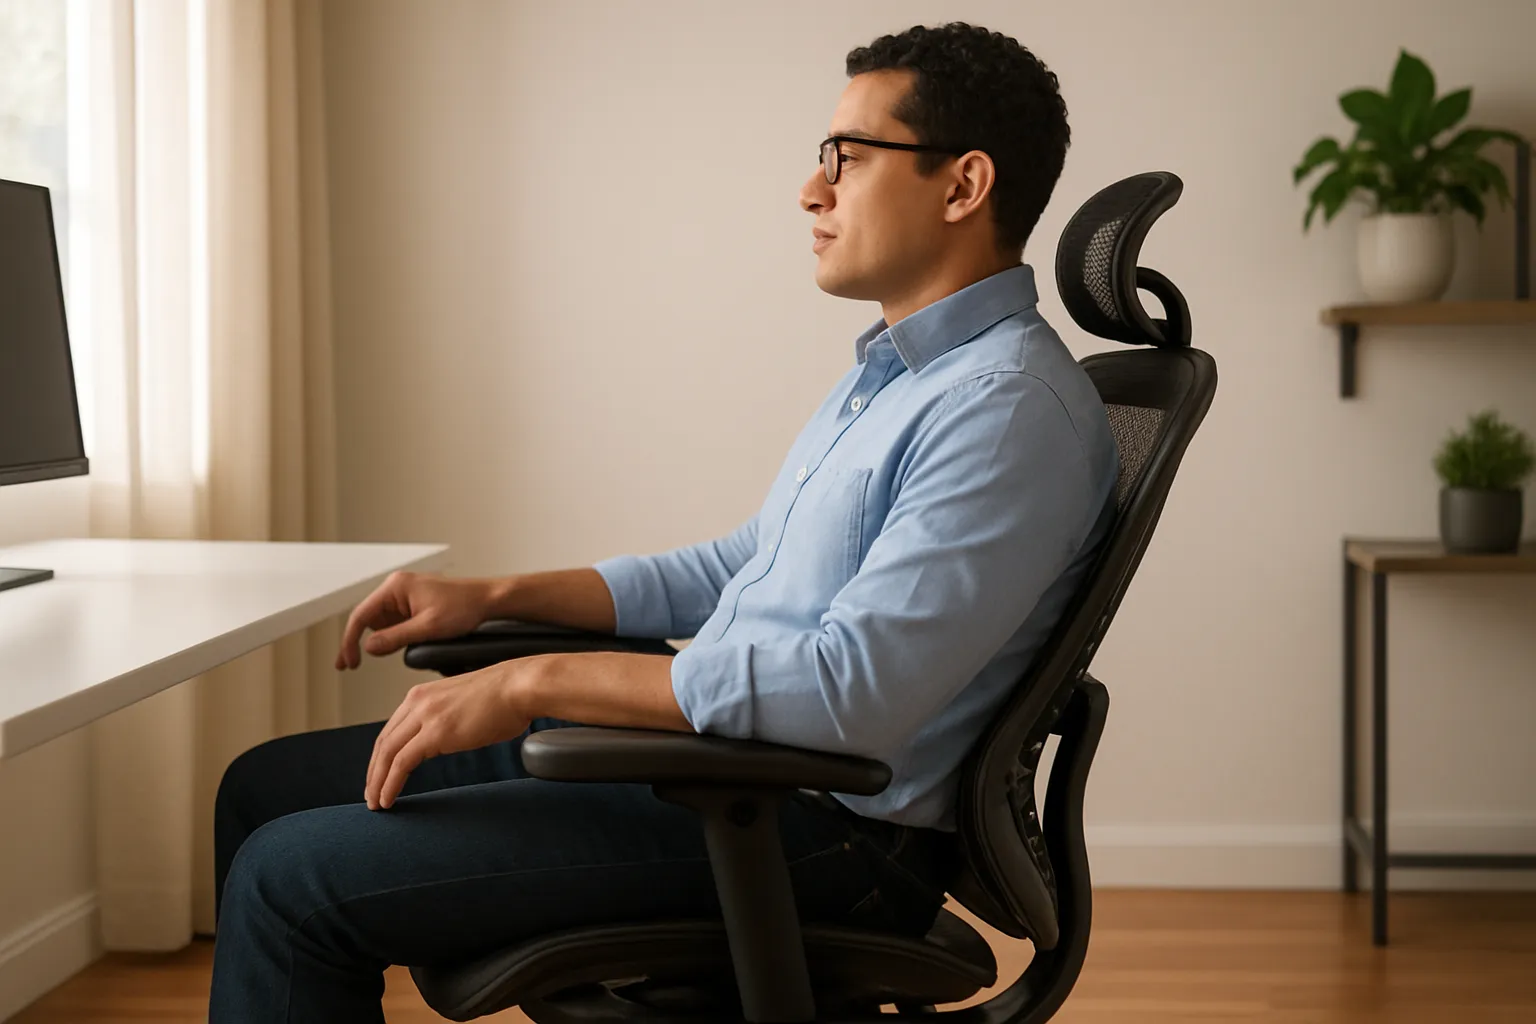
Your chair is the foundation. Get this wrong, and everything downstream suffers. Get it right, and you create a stable base for pain-free work.
Adjust Seat Height for Proper Leg Alignment
Start by setting your seat height so your feet fully rest flat on the floor. Your knees should bend at approximately 90 degrees, with thighs parallel to the ground or sloping slightly downward. This angle promotes healthy circulation and reduces pressure on your lower back and back muscles, while restricting blood flow to your legs.
If your desk is too high and you can't lower it, use a footrest. A 2-inch foam block works. So does a purpose-built adjustable footrest. The key is eliminating dangling feet, which strains hip flexors and lower back muscles, while restricting blood flow to your legs.
Set Lumbar Support and Backrest Angle
Your lower spine curves inward naturally. Good lumbar support fills that curve, preventing the slumping that causes disc compression. Position the lumbar cushion or built-in support at the small of your back, roughly at belt level.
Recline your backrest slightly, around 100-110 degrees. This angle distributes weight across a larger surface area, reducing spinal load by up to 40% compared to sitting fully upright. Armrests should let your shoulders relax, with elbows at roughly 90 degrees and forearms parallel to the floor.
Companies that invest in ergonomically correct workstations see measurable reductions in injury-related absences. It starts with the chair.
Action step: Sit in your adjusted chair for 30 minutes before fine-tuning. Your body needs time to settle into the new position.
Step 2: Set Your Monitor at the Right Height and Distance

Screen placement determines neck and eye strain. A monitor that's too low forces your head forward and down. One that's too high causes you to tilt your chin up, compressing cervical vertebrae.
Align the Top of the Screen With Eye Level
Position your monitor so the top of the screen sits at or slightly below eye level. When you look straight ahead, your gaze should be in the top third of your monitor. This keeps your neck neutral and your eyes comfortable.
A simple test: close your eyes, relax, then open them. Where do they naturally land? That spot should be in the top third of your monitor. Most people need to raise their monitors: a stack of books works temporarily, but an adjustable monitor arm offers precise, lasting control.
If you wear bifocals or progressive lenses, lower your monitor an extra 1-2 inches. This prevents the backward head tilt that causes neck fatigue.
Find the Ideal Viewing Distance
Keep your screen 20-40 inches from your eyes, roughly arm's length. Extend your arm: your fingertips should nearly touch the display. Tilt the monitor upward 10-20 degrees to reduce glare and keep text perpendicular to your line of sight.
For dual monitors, center your primary screen directly in front of you. Angle the secondary monitor inward at 30 degrees. Mayo Clinic's ergonomics guide recommends this arrangement to minimize repetitive neck rotation.
Action step: Take a minute to adjust your monitor so it's at arm's length. If it's outside the 20-40 inch range, take a minute to adjust it to arms-length.
Step 3: Arrange Your Keyboard for Relaxed Shoulders and Wrists

Keyboard position affects everything from your shoulders to your fingertips. A keyboard placed too high, too far, or at the wrong angle creates strain that accumulates with every keystroke.
Keep Your Keyboard Flat and Centered
Flip those keyboard legs down. That backward tilt looks natural but forces your wrists into extension, which means bending upward. Extended wrists compress the carpal tunnel and stress the forearm muscles that control finger movement.
Flat or slightly negative tilt keeps wrists neutral. Position the keyboard directly in front of your body, centered with your monitor. If your keyboard has a number pad you rarely use, consider a tenkeyless model to bring your mouse closer.
Position Your Arms at a 90-Degree Angle
Your elbows should rest at approximately 90 degrees, close to your sides. Forearms stay parallel to the floor or angled slightly downward. This position relaxes your shoulder muscles and prevents the hunching that causes upper back tension.
Push your keyboard close to the desk's edge, leaving space behind it rather than in front. This brings the keys within easy reach without forcing you to extend your arms. According to Cornell University's ergonomic checklist, keeping input devices close reduces shoulder abduction, which is the sideways arm movement that strains deltoid muscles.
Action step: Measure the distance from your keyboard's home row to the desk edge. If it's more than 2 inches, slide the keyboard forward.
Step 4: Place Your Mouse to Minimize Reach and Strain
.avif)
Here's a truth many RSI sufferers learn too late: the mouse often causes more damage than the keyboard. Small, repetitive movements concentrated in the same muscles hour after hour create overuse injuries that sideline careers.
Keep Your Mouse Close to the Keyboard
Every inch you reach for your mouse adds load to your shoulder. Position your mouse immediately beside your keyboard, at the same height, on the same plane. Your elbow should stay close to your body when clicking.
Use a light touch. Gripping the mouse tightly or pressing hard on buttons creates unnecessary muscle tension. Adjust sensitivity so small movements translate into adequate cursor travel.
Choose an Ergonomic Mouse That Fits Your Hand
Standard mice force a palm-down position called pronation. Sustained pronation twists forearm bones and compresses nerves. Many professionals find relief by switching to an ergonomic mouse designed for neutral positioning.
Centered pointing devices like the Contour Design RollerMouse eliminate reaching entirely by placing the cursor control between your hands. Users report that this design reduces shoulder strain because both hands share the workload.
For those who prefer a traditional form factor, the Unimouse offers adjustable angles from 35 to 70 degrees, which means you can find the exact tilt that keeps your forearm neutral. Adjustability matters because hand sizes and preferences vary.
If you're setting up a home office, prioritize a mouse that fits your hand and supports a neutral wrist. The right tool prevents strain before it starts.
Action step: Notice your wrist angle while using your current mouse. If your wrist bends sideways or your palm faces down, research alternatives.
Step 5: Organize Your Desk to Support Movement and Comfort
Even perfect posture becomes problematic if held too long. Your desk layout should encourage posture variation and keep essential items within easy reach.
Clear Clutter and Create Zones for Frequent Tasks
Items you use constantly belong within the primary zone, roughly 15 inches from your body. Less frequent items can sit in the secondary zone, about arm's length. Rarely used objects go in drawers or on shelves.
Ensure at least 2 inches of clearance under your desk for knees and thighs. Blocked legroom forces awkward postures and prevents position changes. If cables or storage boxes crowd your leg space, relocate them.
A document holder positioned beside or below your monitor reduces neck rotation when referencing papers. Angle it to match your screen's tilt.
Add Accessories That Reduce Tension
Consider these practical additions:
- Footrest to maintain proper leg angles when desk height can't be lowered
- Keyboard tray for precise height and tilt adjustment
- Edge pads to soften sharp desk edges that press into forearms
- Sit-stand converter to alternate positions throughout the day
The goal isn't perfection. The goal is to create a workspace that allows natural movement. Professionals who understand job satisfaction and workspace ergonomics design their environments for sustained comfort, not just initial setup.
Action step: Assess the items on your desk. Remove any unnecessary items that clutter your primary and secondary work zones.
Common Ergonomic Mistakes to Avoid
Even well-intentioned setups often include these errors:
- Dangling feet strain hip flexors and contribute to lower back pain. Use a footrest if needed.
- Reaching for the mouse loads the shoulder continuously. Keep pointing devices close.
- Monitor too low forces forward head posture. Raise the screen to eye level.
- Monitor too close causes eye strain and forces a hunched position. Maintain 20-40 inches.
- No lumbar support flattens your spine's natural curve, increasing disc pressure by 40%.
- Cluttered desk blocks movement and creates awkward reaching patterns.
- Static posture held for hours causes muscle fatigue regardless of how "correct" the position. Schedule movement breaks.
Many people run into the same issues: forearm pain that escalates after weeks of heavy mouse use, neck tension from a low monitor, or shoulder fatigue from reaching for a far-away pointing device. Small changes—raising the monitor a few inches and bringing cursor control closer to the body—often reduce discomfort significantly within a few weeks.
Reviewing your setup through a workplace assessment framework catches errors you might overlook. Fresh eyes help.
Action step: Photograph your current setup from the side. Compare your posture against the guidelines above. One image reveals more than a week of self-assessment.
Your Next Steps Toward a Pain-Free Workstation
You now have a complete blueprint for a proper ergonomic desk setup. Start with your chair, work up through your monitor, and finish with keyboard and mouse placement. Each adjustment builds on the last.
Don't overhaul everything at once. Make one change, live with it for a day or two, then refine. Your body needs time to adapt. If you alternate between sitting and standing, apply these same principles to both positions.
If pain persists after optimization, consult an ergonomics professional or occupational health specialist. Some conditions require targeted intervention beyond workspace arrangement.
Your workspace shouldn't hurt you. With the right setup, you can focus on your work instead of your body.
Frequently Asked Questions
What is a proper ergonomic desk setup?
A proper ergonomic desk setup positions your chair, monitor, keyboard, and mouse to maintain neutral posture—keeping joints relaxed, muscles minimally engaged, and your spine's natural curves supported. This arrangement reduces strain on your body during long work hours and helps prevent musculoskeletal issues like back pain and carpal tunnel syndrome.
How high should my monitor be for ergonomic desk setup?
Position your monitor so the top of the screen sits at or slightly below eye level, with the display 20–40 inches (arm's length) from your eyes. Tilt the screen 10–20 degrees upward to reduce glare. If you wear bifocals or progressive lenses, lower the monitor an extra 1–2 inches to prevent neck strain.
What is the correct chair height for desk work?
Set your chair height so your feet rest flat on the floor with knees bent at approximately 90 degrees and thighs parallel to the ground. Your hips should be slightly above your knees to promote circulation. If your desk is too high, use a footrest to avoid dangling feet, which strains hip flexors and lower back muscles.
How can I prevent wrist pain from using a mouse?
Keep your mouse immediately beside your keyboard at the same height, with your elbow close to your body when clicking. Maintain a straight wrist and use a light grip. Consider switching to an ergonomic mouse with adjustable angles or a centered pointing device to reduce pronation and shoulder strain from repetitive reaching.
Why does sitting at a desk cause back pain?
Sitting at a poorly arranged desk forces your body into unnatural positions for hours. Without proper lumbar support, your spine loses its natural curve, increasing disc pressure by up to 40%. Combined with a monitor that's too low—causing forward head posture—these misalignments compound into chronic lower back and neck pain over time.
How often should I take breaks from my desk?
Even with perfect ergonomic positioning, holding any posture too long causes muscle fatigue. Incorporate posture variation throughout your day and consider alternating between sitting and standing if possible. Brief movement breaks every 30–60 minutes help maintain circulation, reduce stiffness, and prevent the cumulative strain that leads to injury.

Which Device Is Right for You?
Take a quick quiz and get a personalized recommendation based on how you work.
