
Essential Ergonomic Office Accessories for a Pain-Free Workday

Ergonomic office accessories can transform your daily work experience from a source of pain to a foundation for productivity. If you spend 6–10+ hours at a computer, coding, designing, editing, or crunching data, your body absorbs the consequences. Wrist strain, neck tension, and lower back aches aren't badges of hard work. They're warning signals.
Here's the good news: research shows ergonomic setups can boost productivity by up to 20%, and some studies report gains as high as 40%. Beyond efficiency, workers using ergonomic equipment report 54% less neck and back pain. That's real relief, not marketing fluff. Accessories deliver the most when they're part of a deliberate work station set up, not added piecemeal.
Whether you're recovering from repetitive strain injury (RSI) or trying to prevent it, the right accessories make all the difference. This guide breaks down eight essential ergonomic office accessories, explains what to look for, and gives you concrete actions to start feeling better today.
Key Takeaways
- Ergonomic office accessories can boost productivity by up to 20% while reducing neck and back pain by 54%.
- Vertical mice and centered rollerbar designs reduce wrist strain by eliminating unnatural forearm positions and repetitive gripping motions.
- Monitor arms and laptop stands position screens at eye level, relieving neck tension caused by looking downward throughout the workday.
- Split and tented ergonomic keyboards align your hands, wrists, and forearms in a neutral position to prevent carpal tunnel syndrome and tendonitis.
- An ergonomic chair with adjustable lumbar support, seat height, and armrests forms the foundation of a healthy workspace.
- Start by addressing your biggest discomfort first—wrist pain calls for an ergonomic mouse, neck tension requires a monitor arm, and back aches signal a chair upgrade.
1. Ergonomic Mice: Your First Line of Defense Against Wrist Strain

Your mouse might be the most-used tool on your desk, and the biggest culprit behind wrist pain. Traditional mice force your forearm into a pronated (palm-down) position, which compresses nerves and tendons over thousands of clicks per day. An ergonomic mouse corrects this.
A CDC-funded study on pointing device designs and upper extremity posture found that different mouse styles significantly affect muscle activity and arm positioning. The takeaway? Your mouse choice directly impacts strain levels.
Vertical Mice vs. Centered Rollerbar Designs
Vertical mice angle your hand into a "handshake" position (roughly 60–90 degrees). This reduces forearm rotation and relieves pressure on the carpal tunnel. They're a solid upgrade from traditional mice, especially for users experiencing early-stage discomfort.
Centered rollerbar designs take a different approach. Products like the Contour Design RollerMouse place the pointing device directly in front of your keyboard, eliminating the reach-and-grip motion entirely. Your hands stay centered, your shoulders stay relaxed, and you use both hands interchangeably, which means no single wrist bears the full workload.
I tested both styles over six months. The vertical mouse helped initially, but switching to a centered rollerbar design eliminated my recurring wrist pain completely. The difference? No gripping. No reaching. Just smooth, minimal-effort navigation.
Key Features to Look For
When shopping for an ergonomic mouse, prioritize these features:
- Adjustable tilt angle (35°–70° lets you customize wrist position)
- Programmable buttons (reduces repetitive clicking)
- Low-force actuation (less pressure = less strain)
- Ambidextrous or hand-specific designs (depending on your needs)
If you're serious about reducing pain with an ergonomic mouse, start here. Replace your current mouse this week, your wrists will thank you within days.
2. Ergonomic Keyboards: Supporting Natural Hand and Arm Alignment

Standard keyboards force your wrists into unnatural angles. Your hands turn inward, your wrists bend upward, and your shoulders hunch forward. Over 8+ hours daily, this posture invites carpal tunnel syndrome, tendonitis, and chronic shoulder tension.
Ergonomic keyboards fix the geometry. They align your hands, wrists, and forearms in a neutral position, which means less strain on every keystroke.
Split and Tented Keyboard Options
Split keyboards separate the key layout into two halves. This lets you position each hand independently, matching your natural shoulder width. No more cramped, hunched typing.
Tented keyboards add vertical angle, tilting the key surfaces outward. This rotation reduces forearm pronation (the same issue that makes traditional mice problematic).
The best ergonomic keyboards combine both features. The Contour Design Balance Keyboard, for example, pairs with a dedicated wrist rest and is part of the three pillars of office equipment ergonomics for a complete solution.
What to look for:
- Negative tilt option (front edge higher than back reduces wrist extension)
- Low-profile keys (shorter key travel means less finger fatigue)
- Adequate key spacing (prevents accidental presses and finger crowding)
- Wireless connectivity (allows flexible positioning)
Action step: If you type more than 4 hours daily, budget for a split or tented keyboard. Most users adapt within 1–2 weeks. The initial learning curve pays off in long-term comfort. This is not the right move if you frequently switch between multiple workstations, portability becomes a factor.
3. Monitor Arms: Positioning Your Screen for Neck and Shoulder Relief

Here's a quick test: look straight ahead with your eyes level. Is the top third of your monitor at eye height? If you're looking down, even slightly, your neck muscles work overtime to support your head's 10–12 pound weight at an angle.
Monitor arms solve this by letting you adjust height, tilt, distance, and angle with precision. Cornell University's ergonomic guidelines recommend positioning your screen so the top is at or slightly below eye level, with the display 20–26 inches from your eyes.
Benefits of monitor arms:
- Eliminate neck strain by raising screens to proper height
- Reduce eye fatigue by optimizing viewing distance and angle
- Free up desk space by removing bulky stands
- Enable easy repositioning for different tasks (coding vs. video calls)
If you use dual monitors, invest in a dual-arm setup. Mismatched heights between screens force constant neck adjustment.
Action step: Measure your current screen height today. If the top edge sits below your eye level, a monitor arm is a priority purchase. Installation takes 15–30 minutes for most models.
Monitor positioning is just one piece of the puzzle. For a full breakdown of how every element works together, see what an ideal ergonomic desk setup actually looks like in practice.
4. Laptop Stands: Elevating Your Display to Eye Level
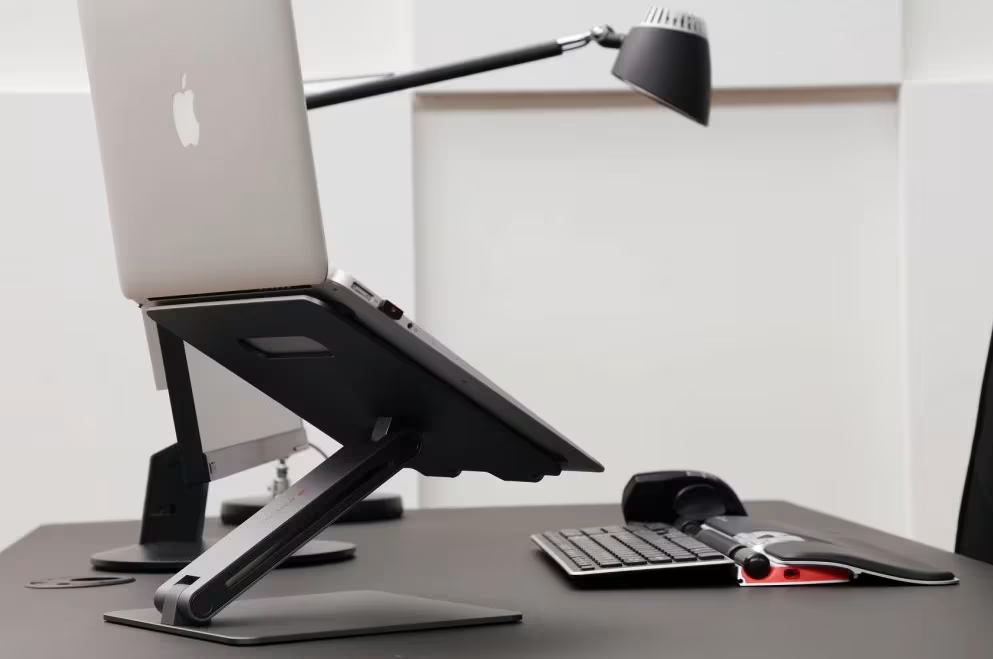
Laptops are ergonomic nightmares by design. The screen and keyboard are connected, which means proper screen height guarantees awkward typing posture, and comfortable typing height guarantees neck strain.
A laptop stand breaks this compromise. Elevate your laptop screen to eye level, then add an external keyboard and mouse for proper hand positioning.
Stand styles to consider:
- Fixed-height stands – Affordable, simple, stable. Work best if you have a consistent desk setup.
- Adjustable stands – Let you fine-tune height and angle. Worth the extra cost for shared workstations or varying tasks.
- Portable stands – Lightweight and foldable. Essential if you work from coffee shops, co-working spaces, or travel frequently.
Not sure which style fits your space? The guide to ergonomic laptop stand for desk walks through the options in more detail.
The NIH's ergonomic computer workstation checklist emphasizes screen positioning as a foundational element. A laptop stand is one of the cheapest ways to meet these standards.
Real-world tip: I made the mistake of using a laptop stand without an external keyboard for three months. My neck felt better, but I developed thumb pain from the cramped laptop keyboard. The lesson? A laptop stand only works as part of a complete system.
Action step: If you use a laptop as your primary machine, order a Contour Laptop Riser and external keyboard today. Budget option: $25–40 for a basic adjustable stand. Time to feel the difference: immediate.
5. Keyboard Trays and Desk Risers: Finding Your Ideal Working Height

Your desk height might be wrong for your body. Standard desks sit around 28–30 inches tall, designed for writing by hand, not typing on a keyboard. For most people, this height forces wrists into extension (bending upward), which strains tendons and compresses nerves. If your desk is the wrong height and a tray isn't an option, an ergonomic keyboard riser can solve the height mismatch without any installation.
Keyboard trays mount under your desk, lowering your keyboard and mouse to elbow height. Your forearms should be parallel to the floor, wrists neutral. A good tray also lets you tilt the keyboard slightly away from you (negative tilt), further reducing wrist strain.
Desk risers and sit-stand converters add another dimension: movement. Alternating between sitting and standing throughout the day reduces static posture fatigue and improves circulation.
Signs you need a keyboard tray or riser:
- Your shoulders hunch upward while typing
- Your wrists bend noticeably upward at the keyboard
- You can't adjust your chair high enough without your feet leaving the floor
- You experience forearm or shoulder fatigue by mid-afternoon
Important consideration: Keyboard trays work best with pull-out designs that allow full adjustment. Cheap, fixed trays often create new problems, like insufficient legroom or restricted mouse movement.
Action step: Sit at your desk and let your arms hang naturally at your sides. Bend your elbows to 90 degrees. Are your hands above your keyboard surface? If yes, a keyboard tray (typically $80–200) can correct the mismatch. Measure your desk thickness first, most trays require 0.75–1.5 inch surfaces.
6. Wrist Rests and Palm Supports: Cushioning High-Impact Zones
Let's clear up a common misconception: wrist rests aren't for resting your wrists while typing. They're for resting your palms between typing bursts. Using them incorrectly, pressing your wrists down while your fingers move, actually increases carpal tunnel pressure.
That said, a quality wrist rest provides genuine value when used properly. It cushions your palms during pauses, keeps your wrists from dropping below keyboard level, and reminds you to maintain neutral positioning.
What makes a good wrist rest:
- Firm but cushioned surface (memory foam or gel with structure)
- Appropriate height (should match your keyboard's front edge height)
- Sufficient length (covers your full keyboard width)
- Non-slip base (stays in place during use)
For tips on maintaining wrist comfort during long office hours, proper rest technique matters as much as the equipment itself.
Honest assessment: Wrist rests are helpful accessories, not solutions. If you're experiencing significant wrist pain, a wrist rest alone won't fix the underlying cause. Address your mouse, keyboard, and desk height first. Then add a wrist rest as a supporting tool.
Action step: Place a rolled-up towel in front of your keyboard for one day. Notice how often you rest your palms on it during pauses. If it's frequent, invest in a proper wrist rest ($15–35). If you rarely use it, skip this accessory and focus elsewhere.
7. Ergonomic Chairs: The Foundation of a Healthy Workspace
You can optimize every accessory on your desk, but a bad chair undermines all of it. Your chair determines spinal alignment, hip angle, leg circulation, and overall posture sustainability throughout the workday.
An ergonomic chair isn't just "comfortable." It actively supports your body's natural curves while allowing movement and adjustment. Research links proper seating to reduced lower back pain, improved focus, and less end-of-day fatigue.
Adjustability Matters Most
The best ergonomic chairs aren't defined by padding thickness or brand name. They're defined by adjustability. Your body is unique, your chair should adapt to it.
Use our ergonomic workstation setup checklist to evaluate your chair and overall setup against key ergonomic standards.
Budget reality: Quality ergonomic chairs range from $300–$1,500+. That's a significant investment. But consider: a good chair lasts 10–15 years. Spread over a decade of 2,000+ working hours annually, even a $1,000 chair costs less than $0.05 per hour. Compare that to physical therapy costs or lost productivity from chronic pain.
Action step: Sit in your current chair and check each adjustment point listed above. If three or more features are missing or broken, prioritize a chair upgrade. If your chair has the features but you've never adjusted them, take 10 minutes today to dial in each setting.
8. Document Holders: Reducing Neck Twist and Eye Strain
If you frequently reference physical documents while working, legal papers, design specs, printed code, or handwritten notes, you're probably doing one of two things: looking down at papers flat on your desk, or twisting your neck to see documents placed off to the side.
Both positions strain your neck and eyes. A document holder solves this by positioning papers at screen height, directly beside (or between) your monitors.
Types of document holders:
- Inline holders – Mount between keyboard and monitor, ideal for primary reference documents
- Side-mount holders – Attach to monitor arm or sit beside screen
- Adjustable stands – Freestanding with height and angle adjustment
- Clipboard-style holders – Portable, simple, budget-friendly
Who benefits most:
- Accountants and financial analysts reviewing printouts
- Legal professionals referencing case documents
- Data entry specialists transferring information from paper
- Designers comparing physical sketches to digital work
Who doesn't need one: If 95%+ of your work is fully digital, skip this accessory. The desk space is better used elsewhere.
Action step: Count how many times you look down at or twist toward physical documents tomorrow. More than 20 times? A document holder ($20–75) will noticeably reduce neck strain within a week.
Conclusion
Building an ergonomic workspace isn't about buying everything at once. It's about identifying your specific pain points and addressing them systematically.
Start with the accessory that matches your biggest discomfort:
- Wrist or forearm pain? Ergonomic mouse first.
- Neck or shoulder tension? Monitor arm or laptop stand.
- Lower back aches? Evaluate your chair.
- General fatigue? Check your keyboard and desk height.
Every accessory in this guide serves one purpose: letting you work without your body paying the price. The research backs it up, ergonomic setups boost productivity by up to 20% while cutting pain reports in half.
You don't need a complete overhaul today. Pick one item. Make one change. Notice the difference. Then build from there. Your future self, the one still working comfortably years from now, will appreciate it.
Frequently Asked Questions
What are the best ergonomic office accessories for reducing wrist pain?
The most effective ergonomic office accessories for wrist pain include vertical mice, centered rollerbar mice, and split or tented keyboards. These tools position your hands in a neutral posture, reducing forearm pronation and carpal tunnel pressure. Pairing them with a proper wrist rest for palm support between typing bursts enhances relief.
How do ergonomic office accessories improve productivity?
Research shows ergonomic office accessories can boost productivity by up to 20–40% by reducing physical discomfort and fatigue. Workers using ergonomic equipment report 54% less neck and back pain, which allows for sustained focus, fewer breaks, and improved work quality throughout the day.
What should I look for when buying an ergonomic keyboard?
Prioritize split or tented designs that align your hands and wrists naturally. Key features include a negative tilt option, low-profile keys for reduced finger fatigue, adequate key spacing, and wireless connectivity. Most users adapt within 1–2 weeks and experience significant long-term comfort improvements.
How high should my monitor be for proper ergonomics?
Position your monitor so the top third of the screen is at or slightly below eye level, with the display 20–26 inches from your eyes. A monitor arm allows precise height, tilt, and distance adjustments, eliminating neck strain caused by looking downward at improperly positioned screens.
Do I need a standing desk for an ergonomic workspace?
A standing desk isn't mandatory, but alternating between sitting and standing reduces static posture fatigue and improves circulation. Sit-stand converters or desk risers offer a budget-friendly alternative, letting you add movement throughout the day without replacing your entire desk setup.
What is the most important ergonomic accessory to invest in first?
Start with the accessory that addresses your biggest discomfort. For wrist or forearm pain, prioritize an ergonomic mouse. Neck or shoulder tension calls for a monitor arm or laptop stand. Lower back pain means evaluating your chair first. Targeting specific pain points yields the fastest relief.

Which Device Is Right for You?
Take a quick quiz and get a personalized recommendation based on how you work.
