
Ergonomic Keyboard Riser: How To Set Up Your Keyboard For Comfort And Control
Most people don't think about keyboard height until the discomfort becomes impossible to ignore. But here's the truth: the position of your keyboard directly impacts your wrists, shoulders, and overall posture throughout the workday. An ergonomic keyboard riser is one of the simplest yet most effective tools for creating a typing setup that works with your body, not against it. In this guide, we'll explain exactly what a keyboard riser does, help you determine whether you need one, and show you how to integrate it into a fully optimized workstation. It's just one piece of the bigger picture, though — see a complete ergonomic workstation example to see how the keyboard, monitor, and chair work together.
What Is An Ergonomic Keyboard Riser And Why Does It Matter
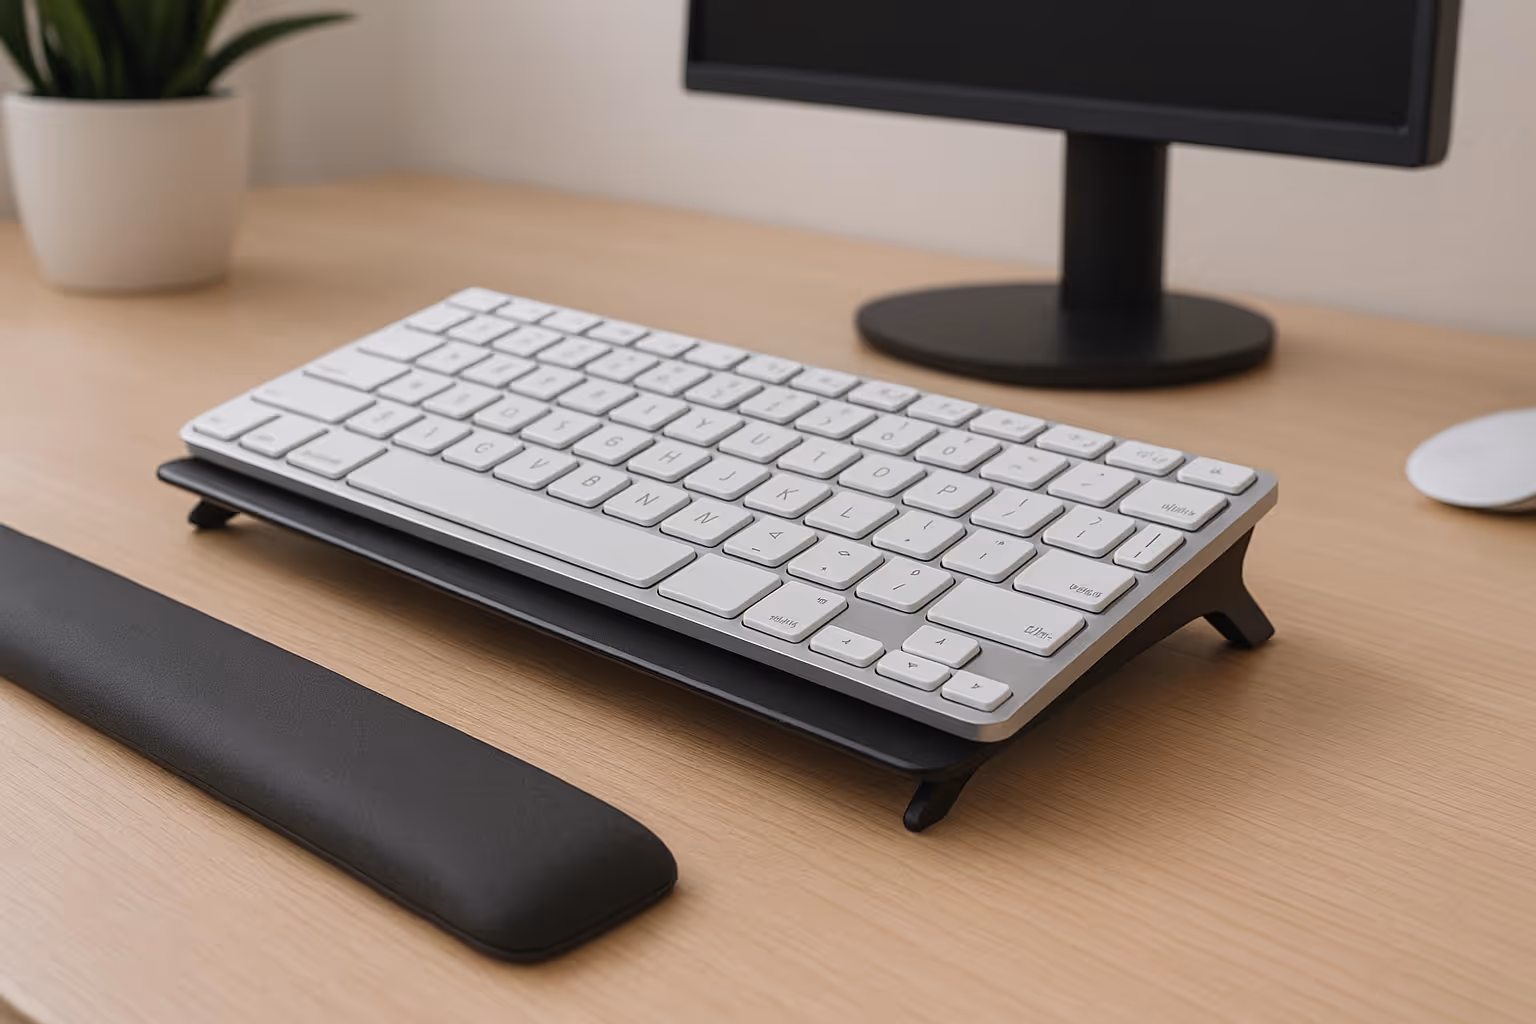
An ergonomic keyboard riser is a platform or tray that lifts and angles your keyboard to a position that supports neutral wrist and arm alignment. Instead of forcing your hands down onto a flat desk surface, a riser brings your keyboard up, closer to elbow height, so your forearms stay parallel to the floor and your wrists don't bend awkwardly.
Why does this matter? Because the angle at which you type directly affects the load on your tendons, muscles, and nerves. Research from Cornell University's ergonomics program shows that poor workstation setup contributes to repetitive strain injuries, including carpal tunnel syndrome and tendinitis. A well-positioned keyboard riser helps interrupt that cycle before it starts, or helps you recover if you're already feeling the effects.
For standing desk users, a riser is especially valuable. It lets you adjust your keyboard height independently from your monitor, so you can stand comfortably without hunching or overextending. And for anyone toggling between sitting and standing throughout the day, that flexibility is essential.
How Poor Keyboard Position Creates Strain
Here's the tricky part: most desks aren't designed with your body in mind. Standard desk heights assume a one-size-fits-all posture, but that rarely matches reality. When your keyboard sits too low, you end up dropping your hands, extending your wrists upward, and cramping your forearms into an unnatural position.
Over time, this creates cumulative stress. Studies have shown that non-ergonomic keyboard setups can increase wrist extension by up to 77%, putting sustained pressure on the carpal tunnel and surrounding tissues. That pressure compounds, day after day, keystroke after keystroke, until you start noticing numbness, tingling, or outright pain. If you're already experiencing these symptoms, our guide on what carpal tunnel syndrome is and how it develops explains what's happening inside your wrist — and what helps.
And it's not just your wrists. Poor keyboard height often means you're leaning forward, which rounds your shoulders and strains your neck. Your body compensates in ways you don't immediately feel, but the damage accumulates. A keyboard riser addresses the root cause by putting your hands where they belong: in line with your elbows, with minimal wrist deviation.
Signs You Need A Keyboard Riser In Your Setup

Not sure if a riser is right for you? Pay attention to what your body's telling you during and after work.
Wrist pain or stiffness is the most obvious signal. If you notice aching or tightness in your wrists, especially after long typing sessions, your keyboard position is likely part of the problem.
Shoulder tension is another red flag. When your keyboard sits too low, you unconsciously hunch forward and elevate your shoulders to compensate. By the end of the day, your traps feel like rocks.
Leaning forward to type suggests your setup isn't meeting you where you are. You shouldn't have to crane your neck or round your back just to reach your keys.
Discomfort when standing is a clear sign your keyboard height isn't adjustable enough. If you've invested in a standing desk but still feel awkward typing while upright, a riser can bridge that gap.
If any of these sound familiar, it's worth experimenting with elevation. Even a small change in keyboard height can relieve surprising amounts of strain, especially when paired with a compact, ergonomic keyboard designed for neutral hand positioning.
Key Features To Look For In An Ergonomic Keyboard Riser
Not all risers are created equal. Here's what separates a solid ergonomic solution from a wobbly disappointment.
Height And Tilt Adjustability
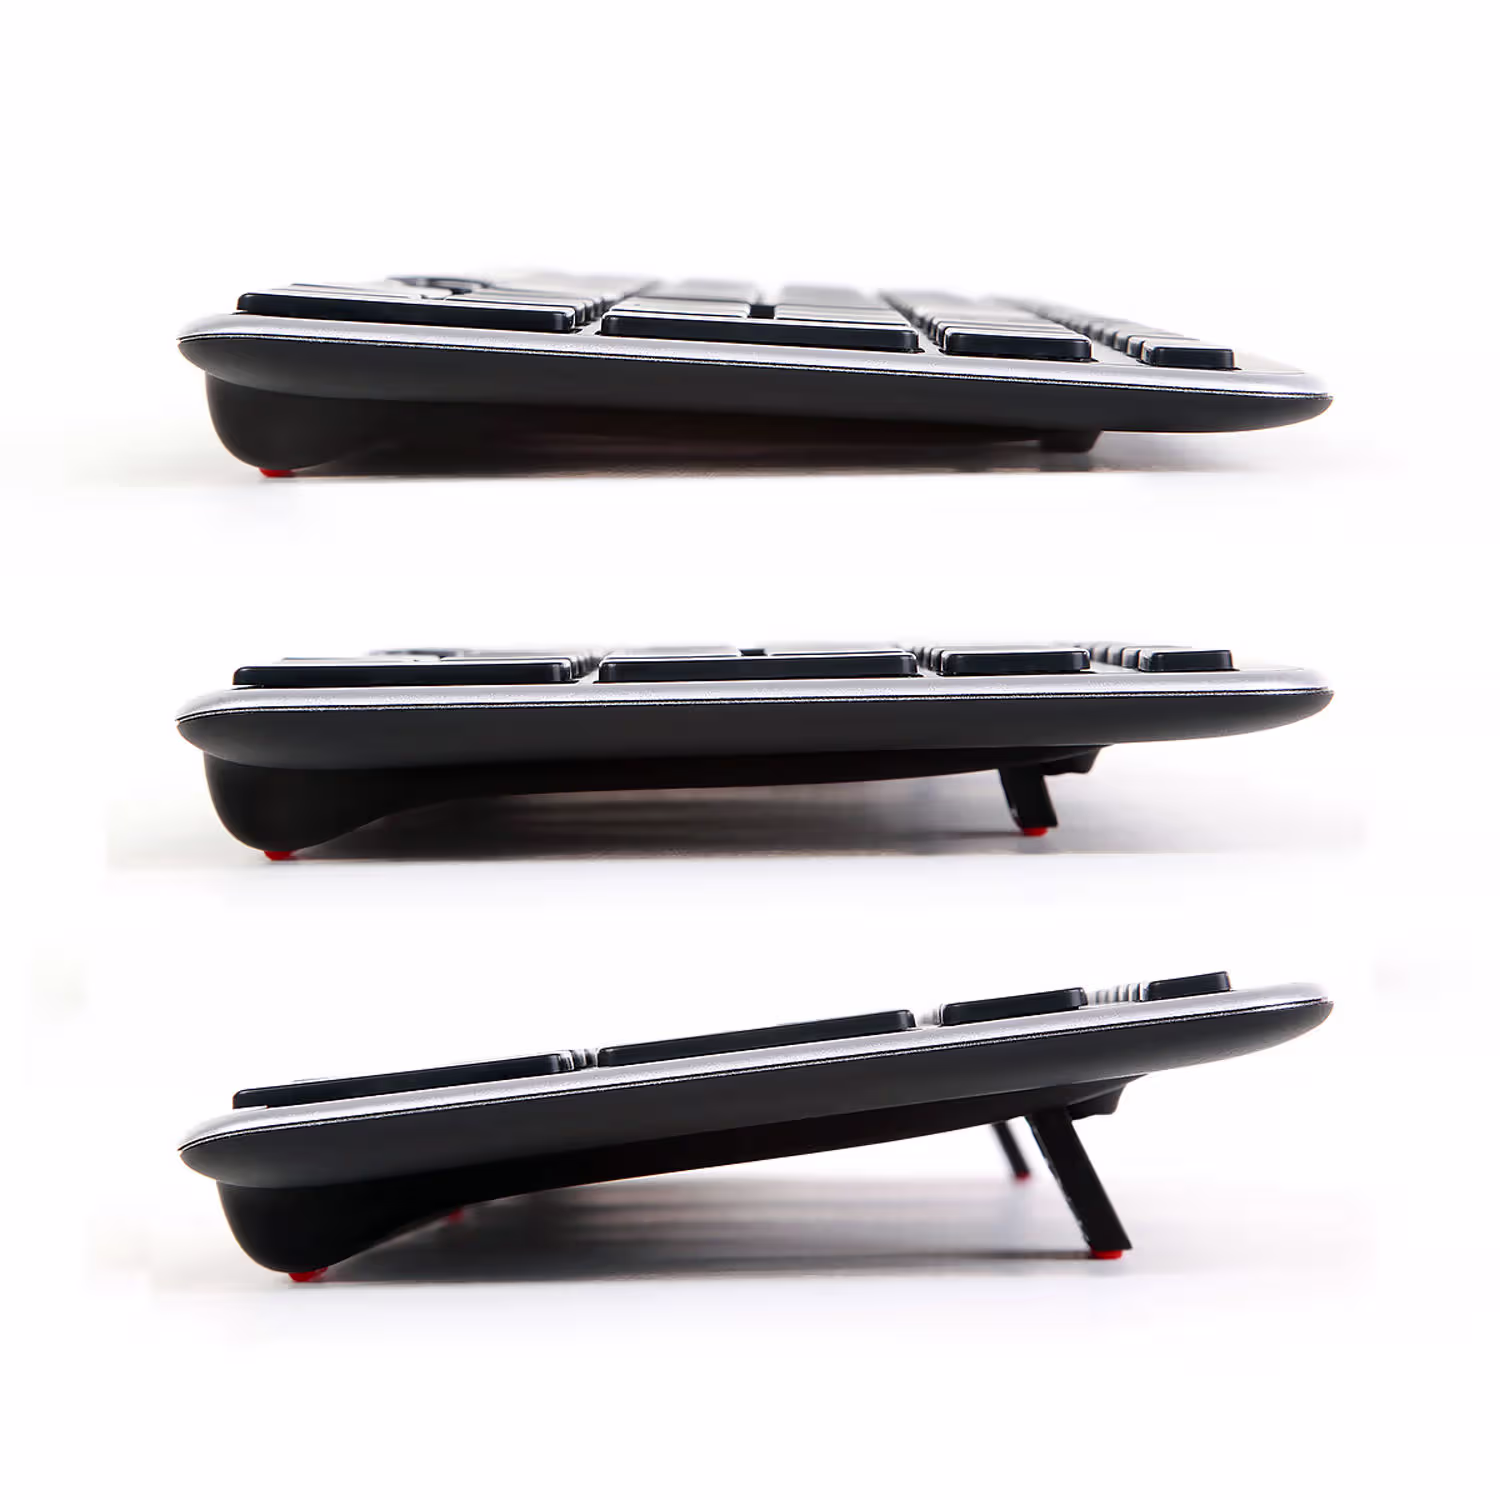
The whole point of a riser is customization, so look for models with multiple height settings. Ideally, you want to position your keyboard at or just below elbow height, with your forearms parallel to the floor.
Tilt matters too. A slight positive tilt (front edge lower than back) can help maintain neutral wrist posture for many users. But this varies by person and preference, some people do better with a flat or even negative tilt. The best risers let you experiment.
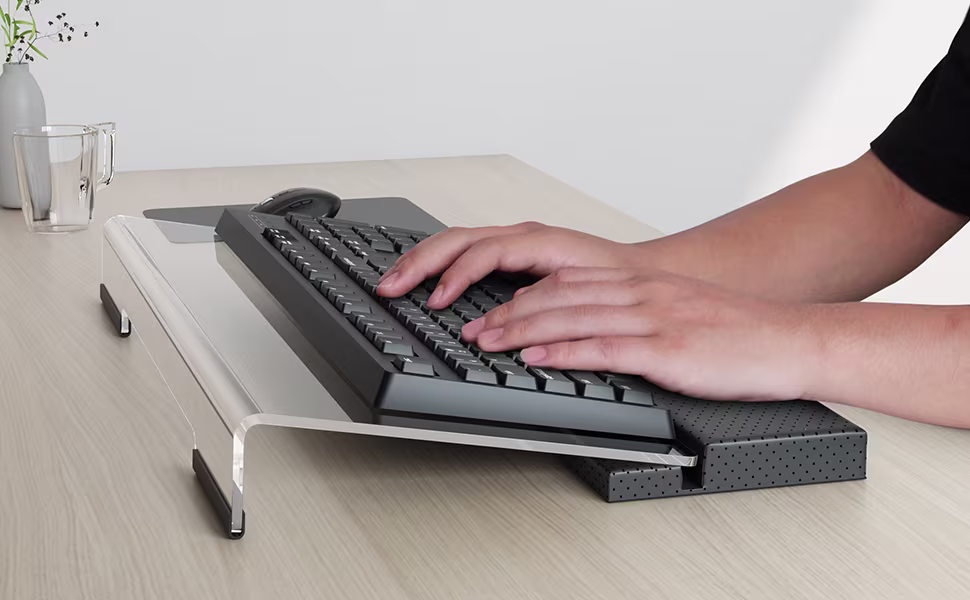
If you're pairing a riser with a centrally positioned pointing device, like the RollerMouse, you'll want a riser designed to accommodate both. The keyboard risers built for the RollerMouse Red give you elevation and tilt options while keeping your mouse and keyboard on the same plane, no reaching required.
Stability And Build Quality
A riser that wobbles or slides defeats the purpose. Look for a wide, sturdy base that stays put during fast typing or heavy use. Cheap risers with narrow footprints or weak adhesives tend to shift over time, which creates frustration and inconsistent posture.
Durability matters for the long haul too. You want something that holds up to daily use without warping, cracking, or losing its grip. Investing in quality here pays off, both in comfort and in not having to replace your setup every year.
How To Position Your Keyboard Riser For Neutral Posture
Once you've got a riser, setup is everything. Here's how to dial it in.
Start at elbow height. Sit or stand with your arms relaxed at your sides, then bend your elbows to 90 degrees. Your keyboard should sit at or just below that level. If you're reaching up or dropping down to type, adjust.
Check your wrist angle. Your wrists should stay straight, not bent up, down, or to the side. If you notice your wrists flexing as you type, tweak the tilt. The NIH's computer workstation guidelines recommend keeping wrists in a neutral position to reduce strain on tendons and nerves.
Adjust for sitting and standing. If you switch positions throughout the day, you'll need to re-adjust your riser height each time. It sounds tedious, but it takes seconds once you know your settings, and it makes a real difference in how your body feels by 5 p.m.
Keep your mouse at the same level. This is where a centrally positioned pointing device like the RollerMouse shines. Because it sits directly in front of your keyboard, your hands stay centered and your arms don't have to reach out to the side. Pairing a riser with a RollerMouse Pro and Balance Keyboard combo creates a unified, elevated platform that keeps everything in the neutral zone.
Pairing Your Keyboard Riser With Other Ergonomic Tools

A riser is a great start, but it works best as part of a complete ergonomic setup. Think of it as one piece of a system that supports your whole body.
Start with your keyboard. Split or curved keyboards can reduce ulnar deviation, that sideways bend in your wrists when you type on a standard board. Research suggests ergonomic keyboards can improve typing speed by up to 11% while reducing strain. The Balance Keyboard from Contour Design features a compact, low-profile design that pairs well with risers and leaves room for a centrally positioned mouse.
Add a centered pointing device. Traditional mice force you to reach out to the side, which rotates your shoulder and creates asymmetric strain. A roller bar or touchpad placed directly in front of your keyboard keeps your arms symmetrical and your shoulders relaxed. The CDC's workstation checklist emphasizes keeping input devices close to the body to minimize reach.
Consider a laptop riser for dual use. If you work on a laptop, even occasionally, a dedicated ergonomic laptop riser can elevate your screen to eye level while you use an external keyboard and mouse. This prevents the hunched-over posture that laptop users know all too well.
The goal is a cohesive workstation where every component supports neutral posture. When your keyboard, mouse, and monitor all work together, you stop fighting your setup and start working with it.
Common Mistakes To Avoid When Using A Keyboard Riser
Even with the right equipment, it's easy to undermine your own ergonomics. Here are the pitfalls to watch for.
Too much positive tilt. A slight angle can help, but cranking your keyboard up to a steep incline forces your wrists into extension, exactly what you're trying to avoid. If you feel strain in the backs of your hands or forearms, flatten the tilt.
Ignoring your mouse. Elevating your keyboard while leaving your mouse on the desk creates an awkward height mismatch. Your arm has to drop down and reach out, which strains your shoulder and defeats the purpose of the riser. Always bring your mouse up to the same level, or better yet, use a centrally positioned device that shares the riser's surface.
Using a laptop without external peripherals. If you're working on a laptop and elevate it with a riser, you'll end up typing on a raised, cramped keyboard while craning your neck to see the screen. The Cornell ergonomics checklist recommends using an external keyboard and mouse whenever possible when your laptop is elevated.
Set-it-and-forget-it syndrome. Your body changes throughout the day. What feels great at 9 a.m. might feel off by 2 p.m. Check in with your posture periodically and make micro-adjustments. Ergonomics isn't a one-time fix, it's an ongoing practice.
Conclusion
Your keyboard position shapes how your wrists, arms, shoulders, and neck feel, not just today, but over months and years of daily use. A well-chosen ergonomic keyboard riser gives you the adjustability to find neutral posture, whether you're sitting, standing, or switching between the two.
Pair it with a compact keyboard, a centrally positioned mouse, and a monitor at eye level — see our guide on the ideal ergonomic desk setup for how every element comes together — and you've built a workstation that works with your body instead of against it.
Your hands are your livelihood. Protect them.
Key Takeaways
- An ergonomic keyboard riser lifts and angles your keyboard to support neutral wrist and arm alignment, reducing strain on tendons, muscles, and nerves.
- Position your keyboard at or just below elbow height with forearms parallel to the floor to achieve proper ergonomic posture.
- Signs you need a keyboard riser include wrist pain, shoulder tension, leaning forward to type, or discomfort when using a standing desk.
- Look for risers with adjustable height, tilt options, and a stable, durable build to customize your setup for maximum comfort.
- Pair your ergonomic keyboard riser with a centrally positioned mouse and compact keyboard to create a cohesive workstation that keeps your arms symmetrical.
- Avoid common mistakes like excessive keyboard tilt, leaving your mouse at a different height, or setting up once and never adjusting again.
Frequently Asked Questions
What is an ergonomic keyboard riser and how does it help?
An ergonomic keyboard riser is a platform that lifts and angles your keyboard to support neutral wrist and arm alignment. It positions your keyboard at elbow height so your forearms stay parallel to the floor, reducing strain on tendons, muscles, and nerves during long typing sessions.
How do I know if I need a keyboard riser for my desk setup?
Signs you need a keyboard riser include wrist pain or stiffness after typing, shoulder tension by end of day, leaning forward to reach your keyboard, or discomfort when typing at a standing desk. If your current setup causes any of these issues, a riser can help restore neutral posture.
What height should an ergonomic keyboard riser be set at?
Your keyboard riser should position your keyboard at or just below elbow height. Sit or stand with arms relaxed, bend elbows to 90 degrees, and adjust the riser so your forearms stay parallel to the floor with wrists straight—not bent up, down, or sideways.
Can I use a keyboard riser with a standing desk?
Yes, a keyboard riser is especially valuable for standing desk users. It lets you adjust keyboard height independently from your monitor, preventing hunching or overextending. If you toggle between sitting and standing, you'll need to re-adjust the riser height for each position.
What's the difference between a keyboard riser and a keyboard tray?
A keyboard riser sits on top of your desk to elevate your keyboard, while a keyboard tray typically mounts underneath the desk surface to lower the keyboard. Risers offer more flexibility for standing desks and are easier to install, while trays work best for seated-only setups.
Should I use my keyboard riser with a wrist rest?
A wrist rest can complement your keyboard riser by providing cushioned support during typing pauses. However, avoid resting your wrists while actively typing, as this can increase pressure on the carpal tunnel. Use wrist rests for breaks only, and ensure they align with your keyboard height.

Which Device Is Right for You?
Take a quick quiz and get a personalized recommendation based on how you work.
