
Ergonomic Workstation Setup Checklist: Your Step-by-Step Guide to Pain-Free Productivity

An ergonomic workstation setup checklist can mean the difference between ending your workday energized or ending it with a stiff neck and aching wrists. If you spend 6+ hours daily at your computer, your setup is either working for you or quietly working against you.
Here's the truth: that nagging shoulder tension or persistent wrist discomfort isn't just annoying. It's a warning sign. And the fix often isn't complicated. It's systematic. This guide walks you through each element of your workstation, step by step, so you can finally work without physical compromise. Let's build a setup that supports your body and your best work.
Key Takeaways
- An ergonomic workstation setup checklist helps prevent musculoskeletal disorders that cost U.S. employers $45–$54 billion annually.
- Position your monitor at eye level and arm's length (20–30 inches) to maintain neutral neck alignment and reduce strain.
- Set your chair height so feet rest flat on the floor with knees at 90 degrees, and adjust lumbar support to preserve your spine's natural curve.
- Keep your keyboard at elbow height with wrists neutral and your mouse within 3 inches of the keyboard to prevent shoulder and wrist strain.
- Take a 30-second microbreak every 30 minutes and incorporate stretches to combat the negative effects of static posture.
- Start with two adjustments targeting your most noticeable discomfort—small, consistent improvements compound into lasting relief.
Why Your Workstation Setup Matters More Than You Think

Most people don't think about their workstation until something hurts. By then, small misalignments have compounded into chronic problems.
Your body adapts to your environment. Sit with your monitor too low for six months, and your neck muscles start to shorten. Reach for your mouse repeatedly at the wrong angle, and forearm tension becomes your default state.
The good news? Reversing this process doesn't require expensive equipment or hours of research. It requires intentional setup choices.
The Real Cost of a Poor Setup
Musculoskeletal disorders (MSDs) account for $45 to $54 billion in annual costs to U.S. employers, according to OSHA estimates. But the personal cost hits closer to home.
Consider what a poorly configured workstation actually costs you:
- Lost productivity: Workers with discomfort take 25% longer to complete tasks
- Medical expenses: Average RSI treatment runs $2,000–$10,000+ without surgery
- Career impact: Chronic pain limits focus, creativity, and career longevity
I've worked with professionals who dismissed early warning signs for years. They adjusted their work habits around pain instead of fixing the source. One software engineer I know spent $8,000 on physical therapy before realizing his monitor was 4 inches too low.
The Cornell University ergonomics guidelines recommend proactive assessment rather than reactive treatment. Prevention costs far less than intervention.
Your action step: Before reading further, notice your current posture right now. Are your shoulders relaxed or creeping toward your ears? That awareness is where change begins.
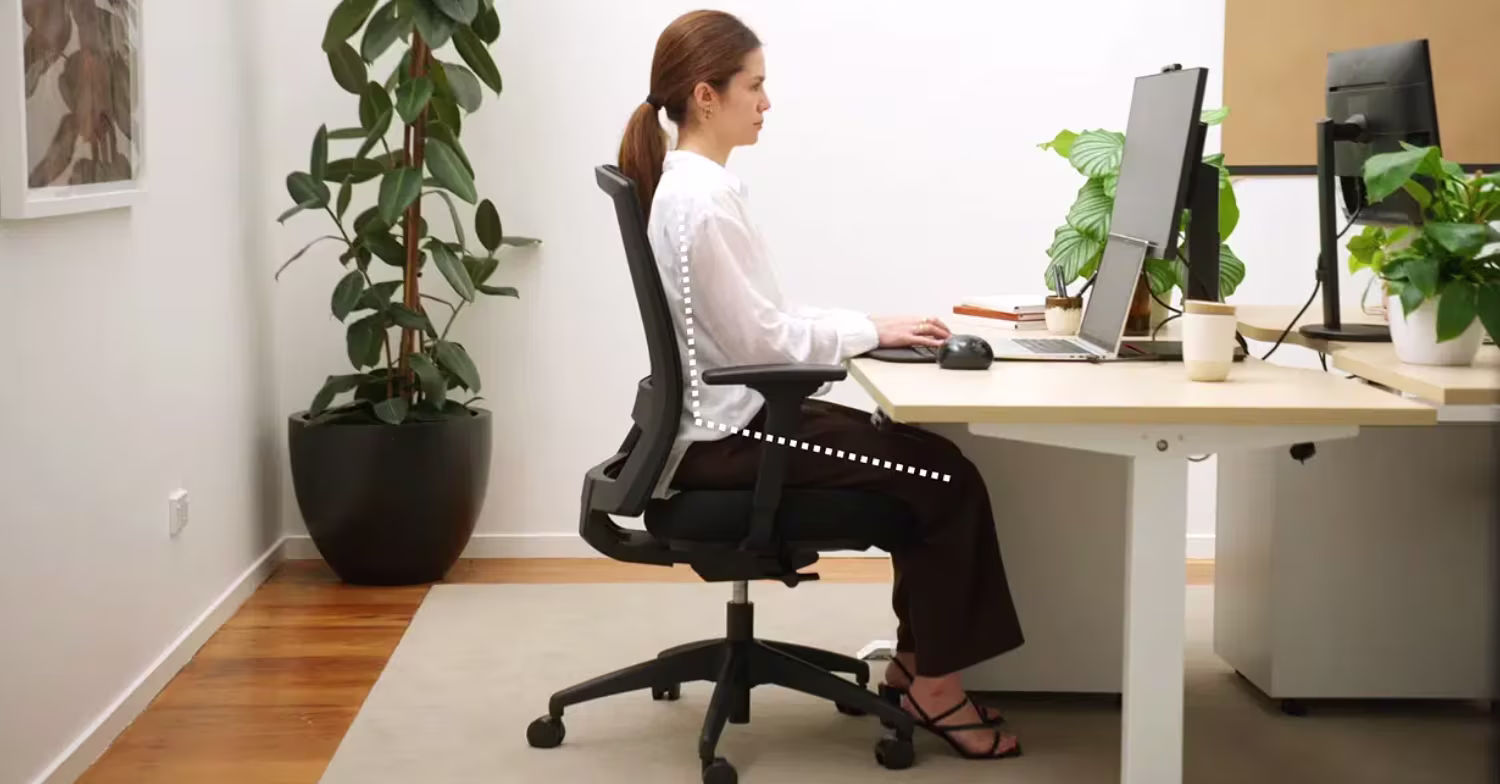
Step 1: Position Your Monitor for Neutral Neck Alignment

Your monitor position determines your head position. Your head weighs about 10–12 pounds. Tilt it forward just 15 degrees, and your neck muscles suddenly support the equivalent of 27 pounds.
This explains why so many desk workers develop "tech neck" and chronic upper back tightness.
Finding the Right Height and Distance
Height: Position the top of your screen at or slightly below eye level. When you look straight ahead with a relaxed neck, your eyes should naturally fall on the upper third of the screen.
If you wear bifocals or progressive lenses, lower your monitor an additional 2–3 inches to avoid tilting your head back.
Distance: Place your monitor 20–30 inches from your eyes (roughly arm's length). Extend your arm: your fingertips should nearly touch the screen.
Tilt: Angle your screen back 10–20 degrees. This reduces glare and keeps your neck in a neutral position.
Dual monitors? Position them so the junction sits directly in front of you if you use both equally. If one is primary, center that screen and angle the secondary toward your dominant eye.
The CDC's workstation checklist provides additional guidance for complex setups.
Your action step: Grab a book or monitor riser and test your monitor 1–2 inches higher than its current position. Work for 30 minutes and notice any change in neck tension.
Step 2: Set Up Your Chair for All-Day Support
Your chair does more than hold you up. It determines whether your spine stays aligned or slowly collapses throughout the day.
Many people sit in chairs adjusted for the previous owner or never adjusted at all. A few minutes of setup pays dividends for years.
Adjusting Seat Height and Lumbar Position
Seat height: Adjust so your feet rest flat on the floor with your knees bent at approximately 90 degrees. Leave a 2–3 finger gap between the seat edge and the back of your knees. This prevents circulation restriction.
Too short for your desk at proper height? Use a footrest rather than raising your chair and dangling your feet.
Lumbar support: Your lower back has a natural inward curve. Your chair should support this curve, not flatten it. Adjust the lumbar support to fit snugly into the small of your back.
No built-in lumbar support? A small rolled towel works temporarily, though dedicated support is worth the investment.
Backrest: A slight recline (15–20 degrees) actually reduces spinal disc pressure compared to sitting bolt upright. Set your backrest to allow a relaxed lean while maintaining lumbar contact.
Armrests: Position them so your elbows rest at 90 degrees with your shoulders completely relaxed. Armrests too high? Your shoulders hunch. Too low? You slump to reach them. If your armrests don't adjust properly, consider removing them entirely.
Your action step: Stand up, then sit back down and adjust your chair height before your body settles into its habitual position. Note what changes.
Step 3: Create the Perfect Desk and Keyboard Placement
.avif)
Desk and keyboard height work together. Get one wrong, and you'll compensate with your shoulders, wrists, or both.
The goal: forearms parallel to the floor, wrists neutral, shoulders dropped.
Achieving a Relaxed Shoulder Position
Keyboard height: Your keyboard should sit at approximately elbow height. When typing, your elbows should bend at 90–110 degrees with your wrists floating neutrally (not angled up or down).
Most standard desks are 29–30 inches high. For someone 5'10", this often works. For those shorter or taller, the mismatch forces compromises.
Solutions for height mismatches:
- Keyboard tray: Lowers your keyboard 2–4 inches below desk surface
- Adjustable desk: Allows precise height tuning
- Chair adjustment: Raise your chair plus add a footrest if needed
For a full walkthrough of how these elements work together, see our guide on how to set up your desk ergonomically correct from the ground up.
Keyboard placement: Position your keyboard so the B key aligns with your belly button. This centers your work and prevents constant rotation.
The home row (ASDF/JKL:) should sit at elbow level. Raise keyboard feet? Skip them. That positive tilt actually increases wrist extension strain.
Desk clearance: You need at least 2 inches of clearance between your thighs and the underside of your desk. If you're bumping your legs, your chair is too high or your desk too low.
If you're planning a complete setup overhaul, these quick workstation fixes can help prioritize changes.
Your action step: Place your hands on your keyboard naturally. Are your wrists bending upward? If so, lower your keyboard or raise your chair (and add a footrest).
Step 4: Choose and Position an Ergonomic Mouse

Here's an uncomfortable truth: the traditional mouse design forces your forearm to rotate inward (pronation) and locks your wrist at an unnatural angle. Do this 10,000+ times daily, and tissue damage becomes inevitable.
Mouse placement matters as much as mouse selection. Your mouse should sit at the same height and distance as your keyboard, directly in front of your shoulder.
Reaching to the side for a mouse positioned beyond your keyboard? Your shoulder compensates with every movement. That's thousands of micro-strains daily.
Why Centered Pointing Devices Reduce Strain
Centered pointing devices (like the RollerMouse) position your cursor control directly in front of you, between your hands. This eliminates the reach-and-grip pattern that traditional mice require.
The biomechanical advantage is significant:
- No forearm pronation: Your hands rest in a neutral, handshake position
- No gripping: Light touch replaces constant grip tension
- No reaching: Shoulders stay relaxed and centered
If forearm fatigue is already an issue, adding forearm support for your desk setup can reduce the load significantly alongside your mouse upgrade.
Warning: Switching to an ergonomic mouse requires a 1–2 week adjustment period. Your muscles have adapted to your current setup. Give them time to readjust to healthier patterns.
Your action step: Measure the distance between your keyboard's right edge and your mouse position. More than 3 inches? Move your mouse closer today.
Step 5: Optimize Lighting and Reduce Screen Glare
Glare and poor lighting cause squinting, eye strain, and unconscious postural shifts. You lean forward to see better. You tilt your head to reduce reflection. These micro-adjustments accumulate into tension patterns.
Position your monitor perpendicular to windows, not facing them or backing up to them. Direct sunlight on your screen creates harsh contrast: bright light behind your screen creates silhouette effect.
Optimal lighting setup:
- Ambient light: Match your screen brightness to surrounding light levels
- Task lighting: Illuminate documents without reflecting off your screen
- Screen position: Tilt back 10–20 degrees to deflect overhead light reflections
Specific fixes for common glare sources:
- Overhead fluorescents: Use a monitor hood or position yourself between fixtures
- Windows: Install blinds or sheer curtains: close them during peak sun hours
- Desk lamps: Position behind and to the side, never in front of you
The NIH's workstation self-assessment includes a lighting evaluation section worth completing.
Your action step: Turn off your monitor and look at the black screen. Note every light source reflecting back. Address the brightest one today.
Step 6: Build Movement and Microbreaks Into Your Day
Static posture is the enemy. Even a perfect ergonomic setup causes problems if you maintain one position for hours.
Your body is designed to move. Sitting perfectly still for 90 minutes reduces blood flow, compresses tissues, and fatigues postural muscles regardless of how "correct" your setup is.
The 30-30 rule: Every 30 minutes, take a 30-second microbreak. Stand, stretch, or simply shift position. Every 60 minutes, take a longer break (2–5 minutes) away from your desk.

Quick Stretches and Reset Routines
These take under 60 seconds and target common tension areas:
Chin tucks (neck): Pull your chin straight back, creating a "double chin." Hold 5 seconds. Repeat 5 times. This counteracts forward head posture.
Shoulder blade squeezes (upper back): Squeeze your shoulder blades together as if holding a pencil between them. Hold 5 seconds. Repeat 10 times.
Wrist circles (forearms): Make fists and rotate your wrists in both directions. 10 circles each way.
Standing hip flexor stretch: Step forward into a lunge, keeping your back straight. Hold 20 seconds each side.
Consider a sit-stand desk if budget allows. Alternating between sitting and standing every 30–60 minutes reduces spinal load and increases energy. You don't need to stand all day. Variation is the goal.
Your action step: Set a recurring timer for 30 minutes. When it sounds, stand and do 3 shoulder blade squeezes before sitting back down.
Your Complete Ergonomic Workstation Checklist at a Glance
Print this checklist and post it near your workspace. Review it weekly until proper setup becomes automatic.
Monitor:
- [ ] Top of screen at or slightly below eye level
- [ ] Distance: 20–30 inches (arm's length)
- [ ] Screen tilted back 10–20 degrees
- [ ] No glare visible on screen surface
Chair:
- [ ] Feet flat on floor (or on footrest)
- [ ] Knees at approximately 90 degrees
- [ ] 2–3 finger gap behind knees
- [ ] Lumbar support fitted to lower back curve
- [ ] Armrests at elbow height, shoulders relaxed
Desk and Keyboard:
- [ ] Keyboard at elbow height
- [ ] Forearms parallel to floor when typing
- [ ] Wrists neutral (not bent up or down)
- [ ] Keyboard centered to body (B key at belly button)
Mouse:
- [ ] Same height as keyboard
- [ ] Within 3 inches of keyboard edge
- [ ] Wrist neutral during use
- [ ] Minimal grip force required
Lighting:
- [ ] Monitor perpendicular to windows
- [ ] No direct light sources reflecting on screen
- [ ] Screen brightness matches ambient light
Movement:
- [ ] Microbreak every 30 minutes scheduled
- [ ] Stretching routine established
- [ ] Position variation built into day
For workplace decision-makers, conducting a formal workstation assessment helps identify team-wide improvement opportunities.
Your action step: Check three items from this list right now. Fix any that don't pass.
Next Steps: Make Your Setup Work for You
You now have a complete roadmap. But here's what matters: execution beats perfection.
Don't try to fix everything today. Pick the two adjustments that address your most noticeable discomfort. Carry out those this week. Add one more next week.
Small, consistent improvements compound. In 30 days, your workstation can support your body instead of straining it.
If you're experiencing persistent pain even though proper setup, consult an occupational health professional. Some issues require hands-on assessment.
Your body tells you when something's wrong. Now you know how to listen and respond. Work shouldn't hurt. It's time to make sure yours doesn't.
Frequently Asked Questions
What should be included in an ergonomic workstation setup checklist?
A comprehensive ergonomic workstation setup checklist should cover monitor height and distance, chair adjustments (seat height, lumbar support, armrests), keyboard and desk placement, mouse positioning, lighting to reduce glare, and scheduled movement breaks. Each element works together to maintain neutral posture and prevent strain.
How high should my monitor be for proper ergonomic setup?
Position the top of your monitor at or slightly below eye level. When looking straight ahead with a relaxed neck, your eyes should naturally fall on the upper third of the screen. Place it 20–30 inches away (arm's length) and tilt it back 10–20 degrees to reduce glare and neck strain.
Why does my neck hurt after working at my desk all day?
Neck pain typically results from poor monitor positioning. When your screen sits too low, you tilt your head forward, increasing the load on your neck muscles significantly. A head tilted just 15 degrees forward makes your neck support nearly triple its normal weight, leading to chronic tension and pain.
How often should I take breaks when working at a computer?
Follow the 30-30 rule: take a 30-second microbreak every 30 minutes to stand, stretch, or shift position. Every 60 minutes, take a longer 2–5 minute break away from your desk. Static posture—even in a perfect setup—reduces blood flow and fatigues muscles over time.
What is the correct keyboard height for an ergonomic workstation?
Your keyboard should sit at approximately elbow height, allowing your elbows to bend at 90–110 degrees while typing. Forearms should be parallel to the floor with wrists floating neutrally—not angled up or down. Avoid raising keyboard feet, as this increases wrist strain.
Can a standing desk improve ergonomics compared to sitting?
A sit-stand desk offers ergonomic benefits by allowing you to alternate positions every 30–60 minutes, reducing spinal load and increasing energy. However, standing all day isn't the goal—variation is. The key is combining proper sitting posture with regular standing intervals and movement breaks.

Which Device Is Right for You?
Take a quick quiz and get a personalized recommendation based on how you work.
