
Office Ergonomics PDF: Your Complete Guide to a Pain-Free Workspace

An office ergonomics PDF can transform how you work. If you spend 6 to 10 hours daily at your computer, you already know the toll it takes: stiff shoulders by noon, wrist pain by 3 PM, and that nagging neck ache that follows you home.
Here's the thing. Most of us know we should "sit better" or "take breaks." But vague advice doesn't fix real pain. What you need is a concrete, printable reference that guides every adjustment you make. That's exactly what a well-designed ergonomics checklist delivers.
This guide walks you through everything: the science behind workspace setup, the specific measurements that matter, and the mistakes that keep causing problems. Whether you're building a home office from scratch or finally fixing the desk setup that's been hurting you for years, you'll leave with an action plan you can start today.
Key Takeaways
- An office ergonomics PDF checklist provides a printable reference to guide every workspace adjustment and reduce physical strain.
- Proper chair, desk, monitor, keyboard, and mouse positioning solves 90% of common workspace pain when set to maintain 90-degree angles at your elbows, hips, and knees.
- Position your monitor an arm's length away with the top of the screen at or slightly below eye level to prevent neck strain and eye fatigue.
- Place your keyboard and mouse close enough to avoid reaching, which causes significant shoulder tension over an 8-hour workday.
- Change positions every 30–45 minutes and use the 20-20-20 rule for your eyes—movement is essential even with a perfect ergonomic setup.
- Start by printing an office ergonomics PDF, assess your current setup, and make free adjustments like repositioning your keyboard and monitor before investing in new equipment.
What Is Office Ergonomics and Why Does It Matter?

Office ergonomics is the science of designing your workspace to fit your body, not the other way around. It covers everything from chair height to monitor distance to how your wrists rest on the keyboard.
The goal is simple: reduce physical stress so you can work longer without pain. When your setup matches your body's natural posture, you eliminate the micro-strains that accumulate into serious injuries over months and years.
According to Cornell University's ergonomics research, proper workstation design reduces muscle fatigue, increases comfort, and improves productivity. This isn't about luxury. It's about protecting your ability to work.
The Real Cost of Poor Ergonomics
The numbers tell a stark story. The U.S. Bureau of Labor Statistics reports that musculoskeletal disorders (MSDs) account for roughly 30% of all worker injury and illness cases requiring days away from work. The average MSD case results in 12 days of missed work.
But the personal cost hits harder than statistics. I've talked with software developers who can't code for more than 30 minutes without wrist pain. Architects who've switched careers because their shoulders couldn't handle another decade of mouse work. These aren't dramatic outliers. They're what happens when small problems go unaddressed.
Consider these warning signs:
- Tingling or numbness in your fingers after an hour of typing
- Neck stiffness that doesn't resolve overnight
- Lower back pain that worsens as the week progresses
- Eye strain and headaches by mid-afternoon
If any of these sound familiar, your workspace is sending a message. The good news: most ergonomic problems have straightforward solutions. You don't need a complete office overhaul. You need the right adjustments in the right places.
Key Elements of an Ergonomic Office Setup
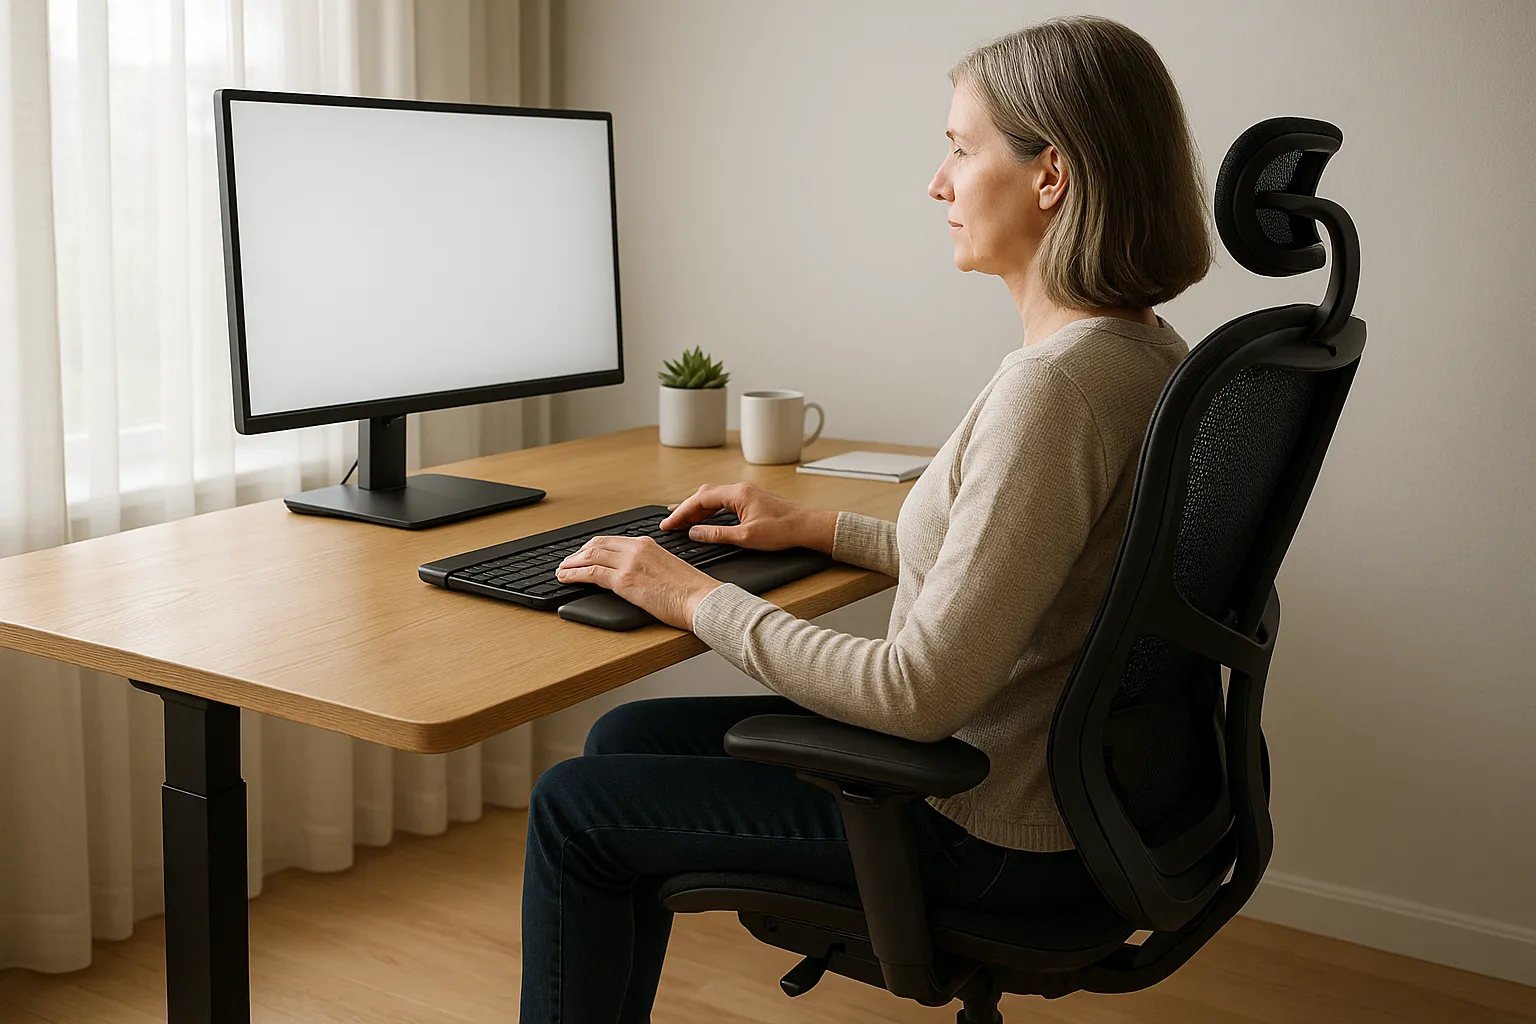
A complete ergonomic office setup addresses five core elements: chair, desk, monitor, keyboard, and mouse. Get these right, and you've solved 90% of common workspace pain.
Chair and Desk Height Essentials
Your chair is the foundation. According to the Canadian Centre for Occupational Health and Safety, a properly adjusted chair keeps your feet flat on the floor, your thighs parallel to the ground, and your lower back supported.
The 90-degree rule matters here. When seated, your knees should bend at approximately 90 degrees, and your hips should also rest at about 90 degrees. Your elbows should form the same angle when your hands rest on the keyboard.
Desk height follows from chair height. For most people, this means the desk surface sits between 28 and 30 inches from the floor. If your desk is too high, you'll shrug your shoulders to reach the keyboard. Too low, and you'll hunch forward.
Quick test: Sit in your chair with your feet flat. Let your arms hang naturally at your sides, then bend your elbows to 90 degrees. Your fingertips should just graze the keyboard. If they don't, adjust your chair or desk height.
Monitor Placement for Neck and Eye Comfort

Monitor position determines whether you end the day with a neutral neck or a forward head posture that strains your cervical spine.
The distance rule: Position your screen about an arm's length away (roughly 20 to 26 inches from your eyes). At this distance, you shouldn't need to lean forward to read text.
The height rule: The top of your screen should sit at or slightly below eye level. This keeps your gaze angled slightly downward (about 10 to 20 degrees), which reduces eye strain and keeps your neck neutral.
For dual monitors, angle them in a slight V-shape and center them on your primary viewing direction. If you use one monitor more than the other, place that one directly in front of you. Using a visual reference helps here. Check out this ergonomic desk setup diagram to see proper placement.
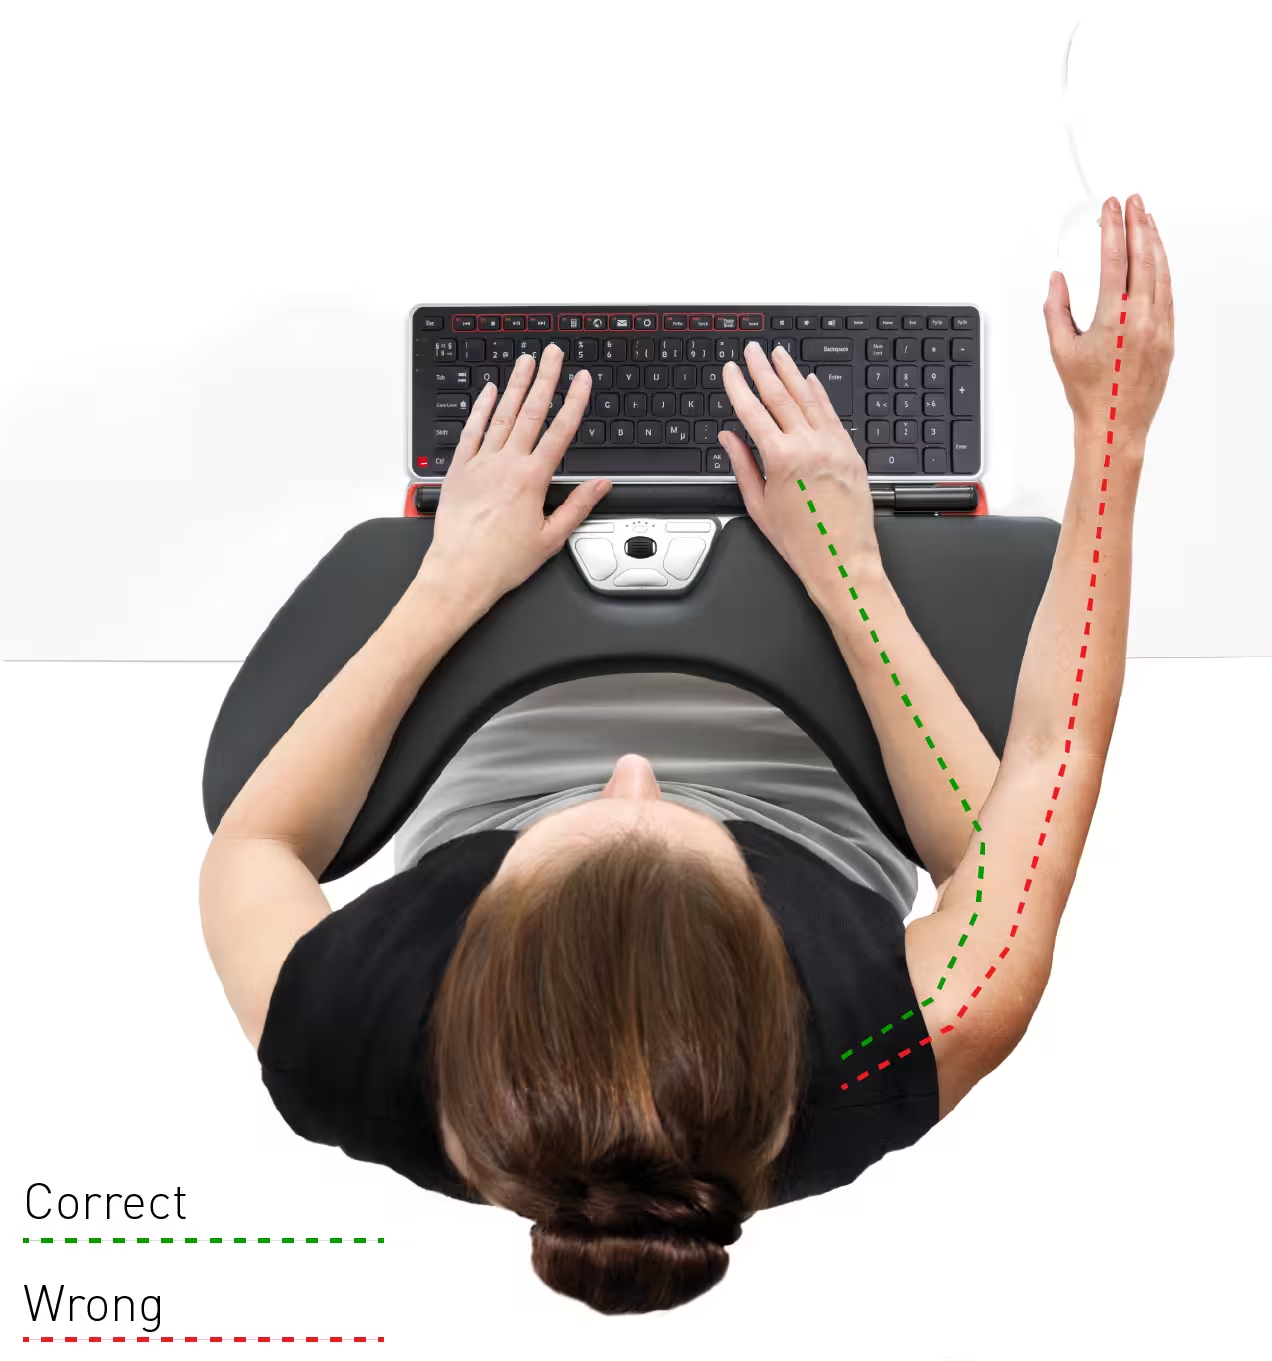
Keyboard and Mouse Positioning
Your keyboard and mouse should sit at the same height, close enough that you don't reach for them. Reaching forward even 2 inches puts significant strain on your shoulders over an 8-hour day. Over 2,000+ mouse movements per day, this adds up fast and is a leading cause of mouse shoulder — a common RSI among office workers.
Keyboard placement: Position your keyboard so your wrists stay neutral (not bent up, down, or sideways). Keyboard trays that tilt slightly downward help many people achieve this. Your wrists should float above the keyboard, not rest on a hard surface while typing.
Mouse placement: Here's where most setups fail. Traditional mice force you to reach to the side, rotating your shoulder outward. This position causes the forearm and shoulder tension so many office workers experience.
Centered pointing devices like Contour Design's RollerMouse place the cursor control directly in front of you, between your keyboard and your body.
How to Use an Office Ergonomics PDF Checklist
A printed ergonomics checklist serves as your setup guide and ongoing reference. Keep one posted near your workstation so you can verify your positioning throughout the day.
The Mayo Clinic's office ergonomics guide recommends checking your setup whenever you notice discomfort. Pain is information. It tells you something needs adjustment.
How to use your checklist effectively:
- Print it and post it. A digital file you never open won't help. Tape the checklist to your wall or monitor stand.
- Work through it systematically. Start with your chair. Move to desk height. Then monitor, keyboard, and mouse. Each element builds on the previous one.
- Make one adjustment at a time. If you change five things at once, you won't know what helped. Give each change 2 to 3 days before evaluating.
- Revisit weekly. Chairs settle. Monitors drift. Keyboards migrate. A weekly 60-second check catches problems before they cause pain.
Contour Design offers a comprehensive workstation setup checklist that covers every element we've discussed. Download it, print it, and use it as your reference during setup.
Pro tip: Take photos of your workspace once you've optimized it. When your setup inevitably drifts over time, you'll have a visual reference for what "correct" looks like.
Common Ergonomic Mistakes to Avoid

After years of helping people fix their workspaces, certain patterns emerge. These are the mistakes I see most often.
Mistake #1: The monitor is too low. Laptops are the worst offenders. When your screen sits at desk level, you tilt your head downward 30 to 45 degrees for hours. This forward head posture adds roughly 10 pounds of effective weight to your cervical spine for every inch your head moves forward.
Fix: Use a laptop stand or external monitor positioned at eye level.
Mistake #2: The mouse lives too far away. Most people place their mouse beside their keyboard, which forces shoulder abduction (reaching outward). Over 2,000+ mouse movements per day, this adds up fast.
Fix: Move your mouse closer, or switch to a centered pointing device that eliminates the reach entirely.
Mistake #3: The chair armrests are wrong. Armrests set too high push your shoulders toward your ears. Armrests set too low let your arms hang, pulling on your shoulders. Many people remove armrests entirely, which isn't ideal either.
Fix: Adjust armrests so your shoulders stay relaxed and your elbows rest at approximately 90 degrees.
Mistake #4: Sitting in one position all day. Even perfect posture becomes problematic when held for 8 hours. Your body needs movement.
Fix: Change positions every 30 to 45 minutes. Stand, stretch, or simply shift your sitting posture. Movement is medicine.
Simple Adjustments That Deliver Real Relief

You don't need to buy a $2,000 chair to feel better. Start with these no-cost and low-cost changes.
Raise your monitor with books. A stack of hardcovers can lift your screen 3 to 4 inches. It's not elegant, but it works immediately. Test the height before investing in a monitor arm.
Reposition your keyboard. Most keyboards sit too far back on the desk. Pull yours forward until your elbows stay close to your body when typing. This single adjustment reduces shoulder strain significantly.
Use the 20-20-20 rule for your eyes. Every 20 minutes, look at something 20 feet away for 20 seconds. This relaxes your eye muscles and reduces end-of-day eyestrain.
Set a movement timer. Apps like Stretchly or simple phone alarms remind you to stand every 30 minutes. Even a 60-second stretch break interrupts the static posture that causes problems.
Adjust your chair's lumbar support. Most office chairs have adjustable lumbar support. Position it to match the natural curve of your lower back. If your chair lacks lumbar support, a rolled towel works surprisingly well.
For a complete reference on making these adjustments, explore these exercises that can prevent and relieve RSI.
Who this advice is NOT for: If you're experiencing numbness, severe pain, or symptoms that don't improve with positioning changes, consult a healthcare provider. Ergonomic adjustments help prevent and reduce strain, but they're not treatment for existing injuries.
Creating Your Own Ergonomic Action Plan
Knowing what to do and actually doing it are different things. Here's a simple framework to turn this knowledge into action.
Week 1: Assess and document.
Print your office ergonomics checklist and evaluate your current setup. Note every item that doesn't meet the guidelines. Take photos of your workstation from multiple angles. Document where you feel pain or tension during your workday.
Week 2: Fix the free stuff.
Start with adjustments that cost nothing: chair height, monitor position, keyboard placement, and armrest settings. Many people are surprised how much relief comes from changes that take 10 minutes total.
Week 3: Address the gaps.
Look at what's still wrong. Maybe you need a monitor stand, a footrest, or better input devices. Prioritize based on where you feel the most discomfort. Pain in your dominant shoulder? Your mouse setup is likely the culprit. Neck pain? Focus on monitor height and angle.
Week 4: Evaluate and refine.
By now, you've made the major changes. Notice what's improved and what hasn't. Some adjustments take time to show results. Others reveal that a different approach is needed.
Ongoing: Build movement habits.
Set reminders for breaks. Consider alternating between sitting and standing if you have that option. Remember: the best posture is the next posture.
Action step for today: Download an office ergonomics PDF checklist. Print it. Spend 10 minutes evaluating your current setup against each item. Circle three things you can fix right now without spending money. Do those today.
Conclusion
Your workspace either supports your health or undermines it. There's no neutral option when you're spending 40+ hours a week at a desk.
The office ergonomics PDF checklist isn't just paperwork. It's a tool that translates ergonomic principles into specific, actionable measurements. Print it, use it, and revisit it regularly. Your body will tell you when something's wrong. The checklist helps you figure out what to fix.
Start small. One adjustment today. Another tomorrow. Within a month, you'll have a workspace that works with your body instead of against it. That's not just comfort. That's protecting your career, your productivity, and your quality of life for years to come.
Frequently Asked Questions
What should an office ergonomics PDF checklist include?
A comprehensive office ergonomics PDF checklist should cover chair height and lumbar support, desk height measurements, monitor distance and height, keyboard and mouse positioning, and break reminders. It serves as a printable reference to verify your setup matches recommended guidelines for pain-free work.
How do I position my monitor for proper office ergonomics?
Position your monitor about an arm's length away (20–26 inches) with the top of the screen at or slightly below eye level. This keeps your gaze angled 10–20 degrees downward, reducing neck strain and eye fatigue during long work sessions.
What is the 90-degree rule in office ergonomics?
The 90-degree rule states that when seated, your knees, hips, and elbows should all bend at approximately 90-degree angles. This positioning keeps your body in a neutral posture, reducing strain on joints and muscles throughout your workday.
Why does mouse placement cause shoulder pain?
Traditional mouse placement beside the keyboard forces shoulder abduction—reaching outward—which strains your shoulder over thousands of daily movements. Positioning your mouse closer or using a centered pointing device eliminates this reach and reduces forearm and shoulder tension.
How often should I take breaks when working at a desk?
Experts recommend changing positions every 30–45 minutes and following the 20-20-20 rule for eye breaks: every 20 minutes, look at something 20 feet away for 20 seconds. Regular movement interrupts static posture and prevents cumulative strain injuries.
Can ergonomic adjustments help existing back or wrist pain?
Ergonomic adjustments can reduce strain and prevent further injury, but they're not a substitute for medical treatment. If you experience numbness, severe pain, or symptoms that don't improve with workspace changes, consult a healthcare provider for proper diagnosis and care.

Which Device Is Right for You?
Take a quick quiz and get a personalized recommendation based on how you work.
