
The Ultimate Office Ergonomics Checklist for a Pain-Free Workday

Your office ergonomics checklist could be the difference between thriving at your desk and dreading it. I learned this the hard way when chronic wrist pain started waking me up at 3 a.m. After eight years of 10-hour coding sessions with a cheap mouse and a chair from college, my body had had enough.
Here's what surprised me: fixing my setup took less than an afternoon. The relief? That took about two weeks to fully arrive, but it came.
This checklist covers everything from chair height to monitor placement, keyboard positioning to healthy work habits. Whether you're dealing with existing pain or want to prevent it, you'll find specific, actionable steps you can carry out today. Let's build you a workspace that works with your body, not against it.
Key Takeaways
- A complete office ergonomics checklist covers chair setup, monitor placement, mouse and keyboard positioning, lighting, and healthy movement habits.
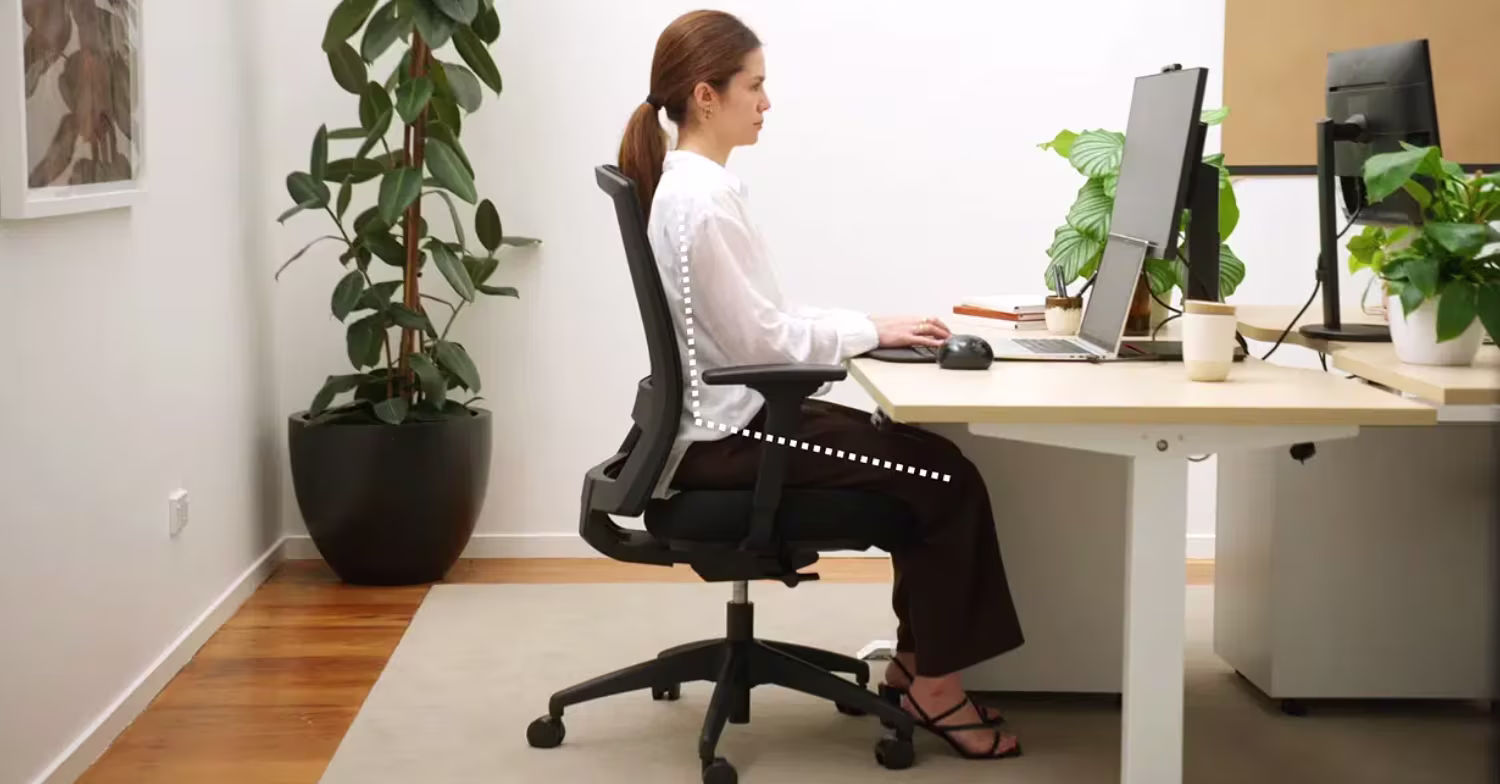
- Adjust your chair so your feet rest flat on the floor, thighs are parallel to the ground, and lumbar support fills the natural curve of your lower back.
- Position your monitor 20–40 inches from your eyes with the top at or slightly below eye level to reduce neck and eye strain.
- Keep your keyboard and mouse at elbow height with wrists straight and avoid reaching or bending to prevent chronic strain.
- Take movement breaks every 30 minutes and follow the 20-20-20 rule to combat eye fatigue and muscle stiffness.
- Small ergonomic adjustments take minutes to implement but studies have shown with the right ergonomic setup 90% of people feel a significant reduction in pain.
Why Office Ergonomics Matter for Long-Term Health

Musculoskeletal disorders (MSDs) cost U.S. employers $45 to $54 billion annually in workers' compensation and lost productivity. That number comes from the Bureau of Labor Statistics, and it represents real people dealing with real pain.
But here's what those statistics don't capture: the slow erosion of quality of life that happens when your workspace fights your body. Poor posture for 8+ hours daily doesn't announce itself with a dramatic injury. It slowly builds through gradual stiffness, tension headaches, and that nagging ache between your shoulder blades.
Proper office ergonomics promotes neutral postures, which means your joints are aligned and muscle effort is minimized. According to Mayo Clinic's office ergonomics guide, this reduces strain on your tendons, muscles, or nerves while lowering injury risk from prolonged sitting.
The transformation can be dramatic. One 2023 study found that workers with optimized workstations reported 32% fewer discomfort complaints within 90 days. That's not just comfort: that's fewer sick days, better focus, and longer career longevity.
Who this matters most for: Anyone spending 6+ hours daily at a computer, especially those already experiencing wrist strain, neck tension, or lower back discomfort. If you want to understand the fundamentals of workplace ergonomics, start there before diving into specifics.
Action step: Take 2 minutes right now to notice where you feel tension. Shoulders creeping toward your ears? Wrist resting at an awkward angle? Write it down. That's your starting point.
Chair and Seating Setup
Your chair is the foundation of your entire setup. Get this wrong, and everything else compensates poorly.
I spent $200 on my first "ergonomic" chair and wondered why my back still hurt. The problem wasn't the chair itself: it was that I never adjusted it properly. Most people don't.
Seat Height and Depth
Seat height determines whether your legs support your weight properly or dangle awkwardly, forcing your thighs to take the load.
The Canadian Centre for Occupational Health and Safety recommends this test: sit back fully in your chair, then check if your feet rest flat on the floor with your thighs parallel to the ground. If your feet dangle, lower the seat or add a footrest. If your knees rise above your hips, raise the seat.
Seat depth is the overlooked adjustment. You want 1-2 inches of clearance between the back of your knees and the seat edge. Too deep, and the seat cuts into your calves, restricting blood flow. Too shallow, and your thighs lack support.
Quick test: Slide your fist between your knee back and the seat edge. It should fit snugly.
Lumbar Support and Backrest Position
Your lower spine curves inward naturally. Without support, that curve flattens under load, stressing your discs and muscles.
Position your lumbar support so it fills the natural hollow of your lower back. This isn't one-size-fits-all: the support point typically sits 6-10 inches above your seat, depending on your torso length. If your chair's built-in lumbar support doesn't reach the right spot, A small, rolled towel or dedicated lumbar pillow works.
The backrest angle should recline slightly (100-110 degrees) rather than sitting perfectly upright. A slight recline reduces spinal disc pressure by up to 25% compared to sitting at 90 degrees.
Action step: Spend 5 minutes adjusting your chair using these measurements. Most office chairs have adjustment levers people never touch. Find yours.
Desk and Monitor Positioning

Once your chair is dialed in, your desk and monitor positioning determines whether you'll lean, crane, or twist to see your screen. None of those are good options.
Optimal Monitor Height and Distance
The top of your monitor should sit at or slightly below eye level. This keeps your neck neutral rather than tilted up or down. The Cornell University Ergonomics Research team found that looking downward at about 15 degrees reduces eye strain and neck tension.
Monitor distance matters too. The sweet spot is 20-40 inches from your eyes, which means you should be able to read comfortably without leaning forward or squinting. A simple test: extend your arm fully: your fingertips should just touch the screen.
For dual monitors, position them so you don't favor one side. If you use both equally, center the gap between them on your nose. If one is primary, center that monitor directly in front of you with the secondary angled 15-30 degrees inwards beside it.
Desk Height and Surface Organization
Your desk height should allow your forearms to rest parallel to the floor when typing, with elbows at roughly 90 degrees. For most people, this means a desk surface between 28-30 inches high.
Here's the test: sit in your properly adjusted chair, let your arms hang naturally, then bend your elbows to 90 degrees. Your hands should hover just above or at keyboard height. If you're reaching up or hunching down, something's off.
Surface organization follows a simple rule: frequently used items belong within easy reach. Items you grab 10+ times daily (mouse, phone, coffee) should sit within 14 inches. Everything else can move further away.
Watch for sharp desk edges pressing into your forearms. This compresses nerves and blood vessels. Padded edge protectors or repositioning your keyboard/mouse can eliminate this pressure.
Action step: Measure your monitor distance right now. If it's under 20 inches, move it back. Your eyes will thank you within days.
Keyboard and Mouse Placement
.avif)
Here's a confession: I ignored keyboard and mouse placement for years because I figured my hands just "figured it out." They didn't. My wrists did, by developing chronic strain that took months to resolve.
Neutral Wrist and Arm Alignment
Neutral wrist position means your wrists aren't bent up, down, or sideways while typing or mousing. Think of a straight line running from your elbow through your forearm and across the back of your hand.
Position your keyboard so the home row (ASDF) aligns with your elbow height. Your forearms should stay parallel to the floor, and your shoulders should remain relaxed, not hunched or elevated.
Your mouse should sit at the same height as your keyboard, close enough that you don't reach for it. Every inch you extend your arm adds load to your shoulder. Over an 8-hour day, those inches become pounds of cumulative strain.
Keep your elbows close to your body at about 90-110 degrees. When elbows flare outward, your shoulders engage unnecessarily, creating tension that radiates into your neck and upper back.
Choosing Ergonomic Input Devices
Not all mice and keyboards are created equal. Standard input devices force your hands into positions that worked for 1980s typing speeds but stress modern all-day users.
Ergonomic keyboards can split or angle to match natural hand positions. This reduces the ulnar deviation (sideways wrist bending) that standard keyboards force.
Ergonomic mice come in several styles. Vertical mice rotate your grip to reduce forearm pronation. Centered pointing devices, like the Contour Design RollerMouse, eliminate reaching entirely by placing the cursor control directly below your keyboard.
The Cornell University ergonomics team developed a comprehensive checklist for evaluating workstation setups, including input device positioning. Their research consistently shows that centered pointing devices reduce shoulder and arm strain compared to traditional side-positioned mice.
Who should upgrade: If you've tried basic ergonomic solutions with limited relief, or if you spend 6+ hours daily mousing, consider centered designs or fully adjustable mice. The investment often pays for itself in reduced discomfort within weeks.
Action step: For the next hour, notice your wrist position while mousing. Is it bent? Reaching? That awareness alone starts the correction process.
Lighting and Environmental Factors

Bad lighting causes problems you might not attribute to your workspace. Eye strain, headaches, and even shoulder tension (from leaning forward to see better) often trace back to lighting issues.
Monitor glare is the most common culprit. Position your screen perpendicular to windows rather than facing them or having them behind you. Direct sunlight on your screen forces you to squint, and bright light behind your monitor creates harsh contrast that fatigues your eyes.
Task lighting should illuminate your desk without creating shadows or hot spots on your screen. Diffused light (think frosted lampshades or indirect bounce lighting) works better than direct overhead lights, which can create glare on glossy surfaces.
The 20-20-20 rule helps combat eye strain: every 20 minutes, look at something 20 feet away for 20 seconds. This relaxes the focusing muscles that tighten during close-up screen work.
Room temperature affects concentration and comfort. Research suggests 68-72°F supports optimal cognitive performance. Too cold, and you'll tense your shoulders. Too warm, and mental fog creeps in.
If you're optimizing a home office, you have more control over these factors than traditional office workers. Use that advantage.
Action step: Look at the screen from your normal sitting position. If you see ceiling lights reflected, adjust your monitor angle or add an anti-glare screen.
Building Healthy Work Habits
The best ergonomic setup in the world won't save you if you sit frozen in one position for 8 hours. Your body needs movement, even small amounts.
The 30-minute rule: Every half hour, shift your position, stand briefly, or take a short walk. This doesn't mean formal exercise breaks (though those help too). Even standing to refill your water or walking to a colleague's desk counts.
If you use a standing desk, limit standing to 40 minutes per hour. Prolonged standing creates its own problems: lower back fatigue, leg strain, and circulatory issues. The goal isn't standing instead of sitting, it's alternating between positions.
Micro-movements matter. Shrug your shoulders. Roll your wrists. Tilt your head side to side. These tiny motions prevent the stiffness that accumulates from sustained positions. I set a silent vibrating timer for every 25 minutes as a reminder.
Eye breaks follow the 20-20-20 rule mentioned earlier. Your eye muscles fatigue just like any other muscle. Giving them periodic distance focusing prevents the cumulative strain that leads to headaches and blurred vision.
Organizations that carry out these practices alongside ergonomic setups see measurable results. Companies that focus on reducing sick leave through optimized ergonomics report both healthier employees and lower absenteeism rates.
For teams or businesses looking to formalize these practices, workplace ergonomic assessments provide structured frameworks for evaluation and improvement.
Action step: Set a timer for 30 minutes. When it goes off, stand up and do one thing away from your desk. Build this into muscle memory over the next two weeks.
Conclusion
Your office ergonomics checklist comes down to this: position your chair so your body is supported, place your monitor where your neck stays neutral, keep your keyboard and mouse where your wrists stay straight, control your lighting, and move regularly.
These aren't complicated changes. Most take minutes to carry out. But the cumulative effect of getting them right compounds over weeks and months into genuine, lasting comfort.
Start with one section today. Maybe it's adjusting your chair height. Maybe it's moving your monitor back those critical few inches. Each small fix builds toward a workspace that supports your health rather than undermining it.
Your body already knows what it needs. Now you have the checklist to give it exactly that.
Frequently Asked Questions
What should be included in an office ergonomics checklist?
A complete office ergonomics checklist covers chair height and lumbar support, monitor positioning at eye level, keyboard and mouse placement for neutral wrist alignment, proper lighting to reduce glare, and healthy movement habits like 30-minute breaks. These adjustments promote neutral postures and reduce strain on your tendons, muscles, or nerves.
How do I adjust my chair for proper ergonomic support?
Set your seat height so feet rest flat on the floor with thighs parallel to the ground. Ensure 1-2 inches of clearance between the back of your knees and seat edge. Position lumbar support to fill your lower back's natural curve, and recline your backrest slightly to 100-110 degrees to reduce spinal disc pressure.
What is the correct monitor height and distance for reducing neck strain?
Place your monitor so the top of the screen sits at or slightly below eye level, positioned 20-40 inches from your eyes. This keeps your neck neutral and reduces eye strain. A simple test: extend your arm fully, and your fingertips should just touch the screen.
Why is keyboard and mouse placement important for ergonomics?
Proper keyboard and mouse placement prevents wrist strain and shoulder tension. Position both at elbow height with forearms parallel to the floor and wrists straight. Keep your mouse at the same level as your keyboard and close enough to avoid reaching, which adds cumulative strain over long work sessions.
How often should I take breaks when working at a desk?
Follow the 30-minute rule by shifting positions, standing briefly, or taking short walks every half hour. For eye strain, use the 20-20-20 rule: every 20 minutes, look at something 20 feet away for 20 seconds. If using a standing desk, alternate positions and limit standing to 40 minutes per hour.
Can poor office ergonomics cause long-term health problems?
Yes, poor office ergonomics can lead to musculoskeletal disorders including chronic back pain, wrist strain, neck tension, and repetitive stress injuries. Prolonged poor posture stresses your spine, joints, and muscles gradually, potentially causing lasting damage that affects quality of life and career longevity.

Which Device Is Right for You?
Take a quick quiz and get a personalized recommendation based on how you work.
