
Ergonomic Workstation Example: A Complete Setup for Comfort and Productivity

An ergonomic workstation example doesn't have to be complicated. It just has to work for your body.
If you spend 6 to 10 hours daily at a computer, you already know the cost of a poorly designed setup. The tight shoulders by 2 PM. The wrist ache that creeps in after a long coding session. The neck stiffness you carry home after editing footage or crunching spreadsheets.
Here's the thing: 9 out of 10 of these discomforts trace back to fixable problems. A monitor too low. A chair that doesn't support your lumbar curve. A mouse positioned so far right that your shoulder works overtime just to reach it.
This guide walks you through a complete ergonomic workstation setup, piece by piece. You'll get specific measurements, clear positioning guidelines, and practical advice you can act on today. No guesswork. No tension. Just a workspace that finally fits you.
Key Takeaways
- A proper ergonomic workstation example starts with your chair and desk height—your keyboard should sit at or slightly below elbow level with feet flat on the floor.
- Position your monitor so the top of the screen is at or slightly below eye level, about 16 to 20 inches away, to prevent neck strain.
- Center your keyboard and mouse directly in front of your body to keep shoulders relaxed and avoid repetitive strain injuries.
- Maintain key ergonomic angles: elbows at 90–110 degrees, knees at 90–110 degrees, and wrists straight while typing.
- Small adjustments like adding a footrest, improving lighting, or using a document holder can significantly enhance your workspace comfort.
- Start by fixing the single biggest issue in your current setup—usually monitor height or mouse positioning—and build improvements from there.
What Makes a Workstation Truly Ergonomic
A workstation becomes truly ergonomic when it supports neutral body postures throughout your workday. That means your joints stay close to their natural midrange positions, and your muscles don't have to work overtime to hold you in place.
According to OSHA's computer workstation guidelines, the goal is simple: minimize strain on muscles, tendons, and skeletal structures. The specifics matter here.
Key angles to maintain:
- Elbows bent at 90 to 110 degrees
- Knees bent at 90 to 110 degrees
- Thighs parallel to the floor
- Shoulders relaxed, not raised or hunched
These aren't arbitrary numbers. They represent positions where blood flows freely, nerves aren't compressed, and muscles operate with minimal effort.
The word "ergonomic" gets slapped on plenty of products that don't deliver. A truly ergonomic setup is one where every element works together: your desk height matches your chair height, your monitor aligns with your eye level, and your input devices sit where your hands naturally fall.
For a deeper understanding of how these elements connect, Cornell University's ergonomics research program provides evidence-based guidelines developed from decades of workplace studies.
Action step: Before shopping for new equipment, sit at your current setup and notice where tension builds. Does your neck crane forward? Do your shoulders rise toward your ears? Do your wrists bend awkwardly? These observations tell you exactly what needs to change.
Desk and Chair: The Foundation of Your Setup

Your desk and chair create the foundation everything else builds on. Get these wrong, and no fancy peripheral can compensate.
Choosing the Right Desk Height and Style
Standard desks are built for the average person. You probably aren't average.
Most fixed-height desks sit at 29 to 30 inches. That works if you're around 5'10" tall. If you're 5'4" or 6'2", that same desk forces compromises.
The ideal desk surface should be at or slightly below your elbow height when you're seated with relaxed shoulders. For most people, that falls between 22 and 28 inches.
Options to consider:
- Adjustable-height desks with a range of 22 to 48 inches accommodate sitting and standing
- Fixed desks with keyboard trays (adjustable between 22-28 inches) let you dial in proper positioning
- Minimum surface dimensions: 27½ inches wide, 16 inches deep for adequate monitor distance
If you're working with a fixed desk that's too high, a keyboard tray mounted below the surface can save your setup. It moves your hands to the correct height without replacing furniture.
For a complete breakdown of desk positioning, our step-by-step desk setup guide covers the specifics.
Selecting an Adjustable, Supportive Chair
Your chair should adapt to you, not the other way around.
Non-negotiable features:
- Height adjustment that allows feet flat on floor (or footrest) with thighs parallel to ground
- Lumbar support that fills the natural curve of your lower spine
- Adjustable armrests that reach elbow height to support forearms
- Seat depth that supports your thighs without pressing behind your knees
A common mistake: setting armrests too high. This forces your shoulders up, creating tension that radiates into your neck and upper back. Armrests should let your shoulders drop completely while supporting your forearms.
Action step: Adjust your chair right now. Plant your feet flat. Check that your knees bend at roughly 90 degrees. If your feet dangle, add a footrest. If your thighs slope downward, raise your seat.
Monitor Placement for Reduced Neck and Eye Strain

Monitor position directly affects your neck, shoulders, and eyes. The average head weighs 10 to 12 pounds. Tilt it forward just 15 degrees to see a low screen, and your neck muscles work against nearly 27 pounds of effective weight.
Optimal monitor positioning:
- Top of screen at or slightly below eye level
- Distance of 16 to 20 inches from your eyes (roughly arm's length)
- Tilt of 10 to 15 degrees backward
- Screen angle perpendicular to windows to reduce glare
If you work with dual monitors, center your primary screen directly in front of you. Place the secondary monitor at an angle to the side. If you use both equally, position them so the inner edges meet at your centerline.
Many people zoom in on text by leaning forward. That defeats the purpose of good monitor placement. Instead, increase your display zoom to 125% or 150%. Your neck will thank you.
For laptop users: an external monitor or laptop stand is essential. Laptop screens built into keyboards force an impossible choice between neck comfort and hand position. You can't have both without external equipment.
Wirecutter's ergonomic workstation guide recommends monitor arms for fine-tuned adjustability, especially in shared workspaces where users have different heights.
Action step: Sit at your workstation and look straight ahead with your eyes closed. Open them. If you're staring at the bottom half of your screen (or your desk), your monitor is too low. Raise it using a stand, arm, or even a sturdy stack of books until your eyes meet the top third of the display.
Ergonomic Mouse and Keyboard Positioning

Your hands spend more time on input devices than anywhere else during work. Poor positioning here is where repetitive strain injuries typically begin.
Centered Input Devices for Natural Arm Alignment
Traditional keyboard-and-mouse layouts push the mouse far to the right. This forces your arm to reach outward, rotating your shoulder and straining muscles that were designed for occasional movement, not sustained positioning.
The centered approach places your input devices directly in front of your body. Your elbows stay close to your torso. Your shoulders stay relaxed. Your forearms extend forward parallel to the floor.
Centered mouse designs, like Contour Design's RollerMouse series, eliminate side-reaching entirely. Instead of gripping and moving a conventional mouse, you control the cursor using a centered rollerbar with your fingertips. No gripping. No reaching. No accumulated strain. If you're weighing your options for a centered pointing device, our guide on the benefits of a centered mouse explains exactly why placement matters for shoulder health.
Whichever devices you choose, position them at elbow height with your upper arms hanging naturally at your sides. Your shoulders should feel completely relaxed, not raised or pulled forward.
Keyboard Angles and Wrist Support
Wrist and forearm pain that builds up over weeks can develop into conditions like carpal tunnel syndrome or tendonitis — both of which are preventable with correct setup from the start. Flat or slightly negative keyboard tilt protects your wrists. Those flip-up feet on the back of your keyboard? They often make things worse by forcing your wrists into extension.
Your wrists should stay straight with no more than 5 to 10 degrees of bend in any direction. Imagine your forearms, wrists, and hands forming one continuous line from elbow to fingertips.
Wrist rests exist to support your palms during pauses, not while typing. Resting your wrists while actively typing creates pressure on the carpal tunnel area and can actually increase injury risk.
Keyboard positioning checklist:
- Keyboard centered on your body (not the desk)
- Slight negative tilt (front edge higher than back) or completely flat
- Close enough that your elbows stay bent at 90 degrees or more
- Number pad optional: consider compact keyboards for better mouse positioning
Action step: Look at your wrists while typing for 30 seconds. If they bend upward, downward, or sideways, adjust your keyboard height and angle until they stay straight.
Lighting, Accessories, and the Finishing Touches
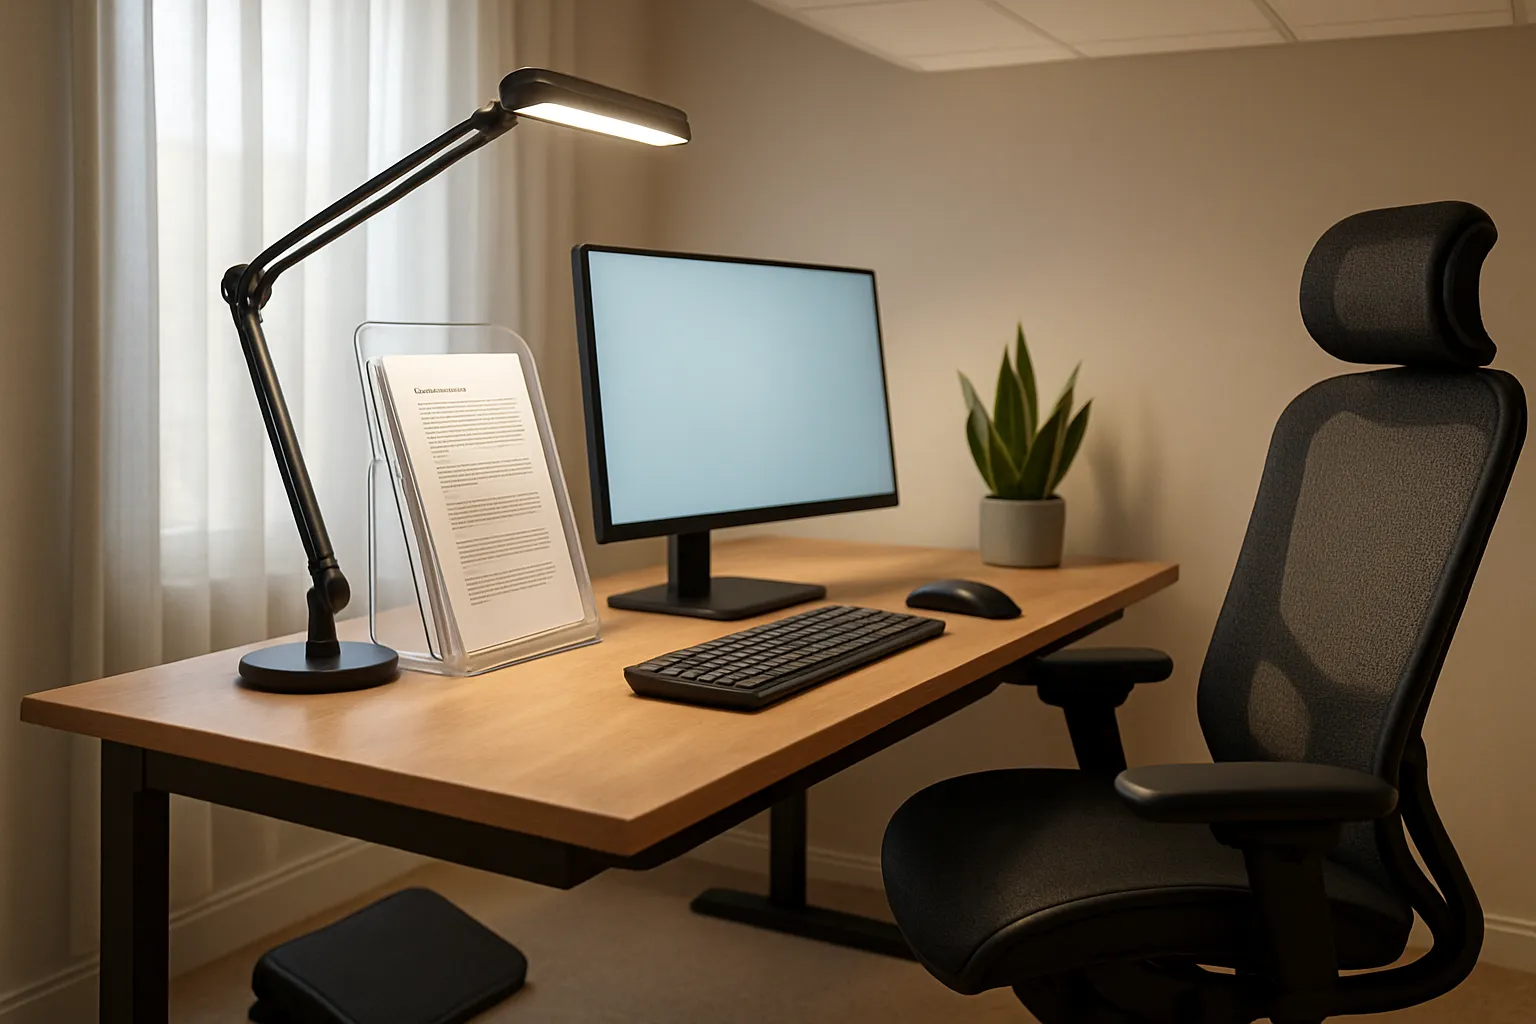
The main components are in place. Now, the details that separate a good setup from a great one.
Lighting affects both comfort and accuracy. Poor lighting forces squinting, leaning, or awkward head positions. Ideal workspace lighting comes from multiple diffused sources rather than a single bright overhead.
Lighting guidelines:
- Position desk perpendicular to windows (not facing or directly opposite)
- Use adjustable task lighting for documents
- Match screen brightness to ambient room light
- Reduce overhead glare with diffusing panels or repositioned fixtures
Footrests matter if your chair doesn't adjust low enough. Your feet need to rest flat on a stable surface. Dangling feet create pressure under your thighs and restrict circulation. A simple angled footrest costs $20 to $50 and solves this instantly.
Document holders position reference materials at eye level beside your monitor. This eliminates the repetitive head-down motion that accumulates neck strain over thousands of glances per day.
Armrest alignment often gets overlooked. Your armrests should match your desk or keyboard tray height exactly, creating one continuous support surface for your forearms. A mismatch forces your shoulders to compensate.
Action step: Stand up and look at your workspace from the side. Is there smooth, continuous support from your chair arms through your keyboard surface? Are light sources positioned to illuminate your work without creating screen glare?
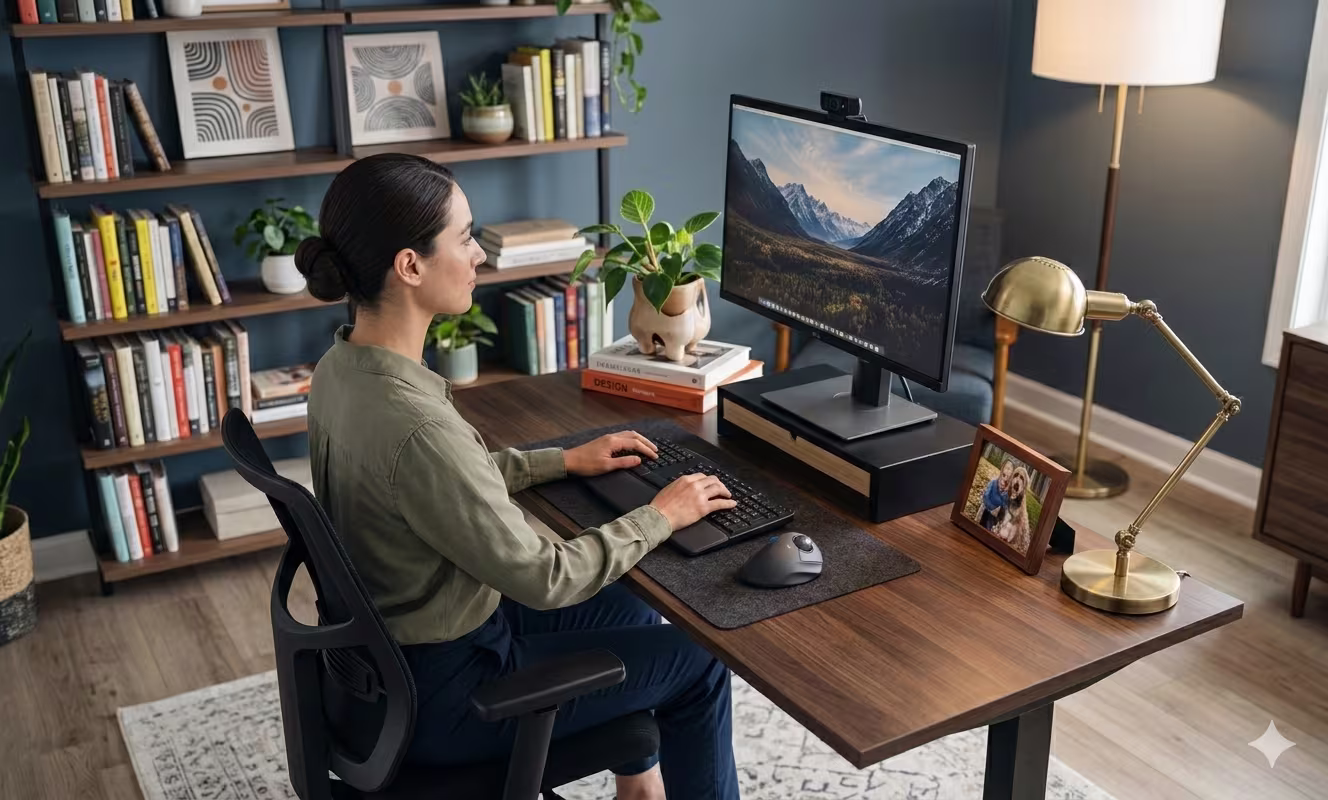
Bringing It All Together: A Sample Ergonomic Workstation Layout
Here's what a complete ergonomic workstation example looks like when every element aligns properly.
Chair configuration:
- Seat height adjusted so feet rest flat on floor (or footrest)
- Knees bent at approximately 90 degrees
- Lumbar support positioned in the small of your back
- Armrests at elbow height, shoulders completely relaxed
Desk and work surface:
- Surface height at or below elbow level when seated
- Keyboard and mouse centered in front of your body
- Minimum 16 inches of depth between keyboard edge and monitor
Monitor positioning:
- Top of screen at or slightly below eye level
- Screen 16 to 20 inches from eyes (arm's length)
- Tilted back 10 to 15 degrees
- Primary screen directly centered: secondary at an angle
Input device arrangement:
- Keyboard flat or with slight negative tilt
- Mouse (or centered pointing device) immediately adjacent to keyboard
- Wrists straight during active typing and mousing
- Upper arms hanging naturally at sides
Environment and accessories:
- Diffused lighting from side, not directly overhead or behind
- Task light for documents if needed
- Footrest if feet don't reach floor comfortably
- Document holder at monitor height for reference materials
This layout creates what ergonomists call a neutral working posture. Your body maintains its natural curves. Your joints stay in midrange positions. Muscles work minimally to maintain position.
For a step-by-step approach to building this setup yourself, the ergonomic workstation setup checklist guides you through each adjustment in order.
Action step: Take a photo of yourself at your current workstation from the side. Compare your posture to the guidelines above. Identify the single biggest deviation and fix it today. Stack improvements over the next week until your setup matches this ergonomic workstation example completely.
Conclusion
Building an ergonomic workstation isn't about buying expensive equipment. It's about understanding how your body works and arranging your workspace to support it.
The professionals who avoid RSI aren't lucky. They're deliberate. They set their monitors at eye level. They position their keyboards where their hands naturally fall. They choose input devices that don't force their shoulders into awkward positions for eight hours straight.
You now have the specific measurements, angles, and positioning guidelines to build this setup yourself. A desk at elbow height. A chair that supports your lumbar curve. A monitor at arm's length with the top at eye level. Input devices centered so your shoulders can finally relax.
Start with the change that will have the biggest impact on your specific discomfort. For most people, that's monitor height or mouse positioning. One adjustment today. Another tomorrow. Within a week, you'll be working in a space that finally fits your body.
Your hands, neck, and shoulders do the work that pays your bills. They deserve a workspace designed for them.
Frequently Asked Questions
What is an ergonomic workstation example that actually prevents discomfort?
A proper ergonomic workstation example includes an adjustable chair with lumbar support, a desk at elbow height, a monitor positioned at eye level and arm's length away, and centered input devices. Every element works together to maintain neutral postures with 90–110 degree angles at elbows and knees.
How should I position my monitor for an ergonomic workstation setup?
Place the top of your monitor at or slightly below eye level, approximately 16–20 inches (arm's length) from your eyes. Tilt the screen back 10–15 degrees and position it perpendicular to windows to reduce glare. For dual monitors, center your primary screen directly in front of you.
What is the correct desk height for an ergonomic workstation?
The ideal desk surface should sit at or slightly below your elbow height when seated with relaxed shoulders—typically between 22–28 inches for most people. Adjustable-height desks with a range of 22–48 inches offer the best flexibility for both sitting and standing work positions.
Why does centered mouse placement matter in an ergonomic setup?
Traditional mouse layouts force your arm to reach outward, straining shoulder muscles over hours of sustained use. Centered input devices keep elbows close to your torso and shoulders relaxed, eliminating the side-reaching motion that leads to accumulated strain and repetitive stress injuries.
Can I create an ergonomic workstation without buying expensive equipment?
Yes. Start by adjusting your current chair height so feet rest flat, raise your monitor using books or a simple stand, and center your keyboard in front of your body. Many ergonomic improvements come from proper positioning rather than purchasing specialized equipment.
How do I know if my current workstation setup is causing strain?
Sit at your workstation and notice where tension builds. Common signs include neck craning forward, shoulders rising toward ears, wrists bending awkwardly, or tight shoulders by mid-afternoon. These observations identify exactly which adjustments your ergonomic workstation example needs.

Which Device Is Right for You?
Take a quick quiz and get a personalized recommendation based on how you work.
